Up next in 10


*whenever I say flayed one flesh I actually mean fyreslayer flesh because paint names*
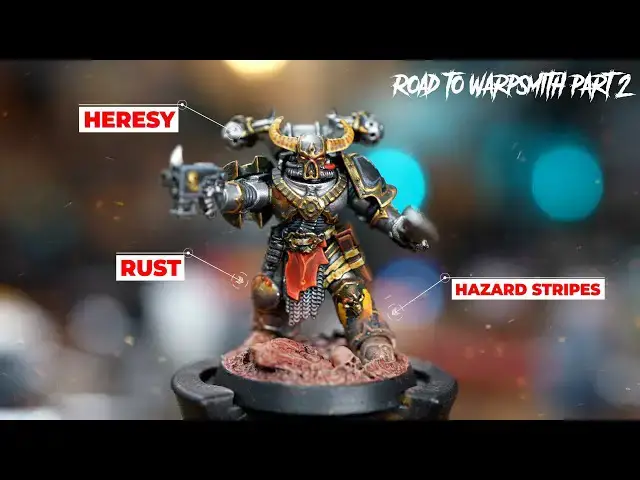
Part 2 of learning to paint iron warriors, this episode I'm focusing on how to paint hazard stripes and merging together tutorials from part 1. Huge thank you to these creators and everyone who watched and commented on part 1 it was hugely helpful.
Pete the Wargamer: https://youtu.be/dFfZ-06cTDE
The Painting Coach: https://youtu.be/eKOYmyAfSo0
Duncan Rhodes: https://youtu.be/DAnZjL-GsRI
Juan Hidalgo: https://youtu.be/-mz4g5dcGHI
Element games for all of your hobby needs:
https://elementgames.co.uk/?d=10835
Follow us:
https://www.instagram.com/thepaintingphase/
https://www.instagram.com/pileofshamepaints/
https://www.instagram.com/geoffsavory/
Check out Faith and Damnation Hobby Group:
https://www.facebook.com/groups/14562…
Show More Show Less View Video Transcript
0:00
welcome back to my pile of shame where i
0:03
a painting noob and videographer try and
0:05
learn how to paint exclusively using
0:08
content on the internet
0:10
[Music]
0:13
this is part two of my road to painting
0:16
a walksmith series you can watch part
0:18
one just up here and in that episode i
0:21
painted up four marines from four
0:24
different creators to try and get to
0:26
grips with how to paint i'm warriors in
0:28
this episode i'm going to take those
0:30
four marines and try and
0:32
smush them together into a scheme that i
0:36
want to paint my warpsmith with i also
0:39
want to try and figure out the best way
0:40
to paint hazard stripes too
0:42
i'm also going to be trying out microset
0:44
and sol for transfers and dirty down
0:47
rust and verdigris for some extra
0:50
weathering everyone's raving about these
0:51
things
0:52
online so like the impression about a
0:54
little boy i am why not anyway i'm
0:57
getting carried away
0:58
build montage
1:31
i've sprayed these either lead belcher
1:33
or black and in a variety of
1:34
sub-assemblies some with weapons
1:36
separate backpack separate or
1:39
everything everywhere i want to try and
1:41
figure out which way i like the best
1:43
because you know i don't know what i'm
1:45
doing and for those of you that have
1:46
watched part one you might remember i
1:48
had a bit of a nightmare with green
1:50
stuff world chrome paint none of that
1:52
this time got the real deal
1:55
so i started from black and i dry
1:57
brushed lead belcher over the top i
1:59
really like the trim of pete the
2:00
wargamer's marine so i wanted to
2:02
replicate that
2:03
but with the armor from juan hidalgo's
2:06
tutorial with the shading and colours
2:09
from duncan's tutorial still with me
2:12
good
2:13
after dry brushing the model and
2:15
preserving it on the trim i filled in
2:17
the panels with a belcher by hand which
2:19
took
2:20
ages i really don't feel like doing that
2:23
again
2:27
[Music]
2:41
using chrome model air was awesome but i
2:43
definitely overloaded my brush once or
2:45
twice and gave this guy a really bright
2:48
ass lesson learned for next time we'll
2:51
be removing some of the excess off the
2:52
brush before going in for the highlights
2:56
[Music]
2:58
taking on the recommendations from all
3:00
of the comments
3:02
here on youtube on tiktok and instagram
3:05
i bought some two millimeter tape to try
3:07
and paint some perfectly straight hazard
3:10
lines
3:11
i had some issues trying to get them
3:13
round the shoulder pad and over the trim
3:16
see some paint got underneath the tape
3:19
but it was really easy to clean up and
3:22
for the most part the results were great
3:25
but are they worth the faff involved
3:28
with putting tape on your marines
3:31
more on that in a bit
3:39
[Music]
3:47
i didn't base any of my miniatures last
3:49
time so for this one i'm following
3:50
duncan rose's martian bases tutorial no
3:54
particular reason i just think martian
3:56
bases are really cool
4:01
i also followed the quick tutorial from
4:02
maverick paints over on his instagram
4:04
reels for the transfers
4:07
using the combination of microset
4:09
microsol they do look great you do get
4:11
that painted on look this was my first
4:13
attempt and
4:14
i think it went pretty well the only
4:17
thing i think i need to work on is the
4:19
gray highlight
4:20
on the black shoulder pad it's
4:23
definitely a bit fat
4:25
here and you can see that the transfer
4:28
sort of poked over a little bit so more
4:30
attention to thinning that down next
4:33
time
4:34
[Music]
4:41
[Music]
4:47
the rust on this model turns out pretty
4:49
good
4:50
but i'm not sure i'm a fan of the
4:53
verdigris more practice perhaps overall
4:56
i'm really happy with this iteration of
4:58
my iron warrior though something i
5:00
definitely got wrong was the shade color
5:04
on the hazard stripes all of these
5:06
tutorials rattling around in my brain i
5:08
mixed up i think wild wood and flayed
5:11
one flesh i used wild wood on this one
5:14
and the results aren't great as you can
5:17
see i couldn't really glaze it
5:19
particularly well
5:21
and
5:22
as it's thinned down it started to
5:24
separate and some parts look like
5:25
they've dried slightly green tried to
5:28
eliminate it by glazing up with with
5:30
yellow but it it it just hasn't really
5:33
worked very well well i've covered it up
5:35
on the leg with some stippling and dry
5:37
brushing of the dust from the base but
5:40
on the shoulder it's particularly
5:42
noticeable
5:43
something else that i chose to do that
5:45
didn't work in my favor was highlighting
5:47
the trim
5:48
gold stupidly it does cover up all of my
5:52
dry brushing work that i'd done earlier
5:53
which was exactly
5:56
the whole point of doing the trim like
5:58
this so that was
6:00
done
6:03
i want to paint the trim last so maybe
6:04
next time i can simulate a dry brush
6:07
after painting the armor
6:10
who knows we'll we'll see what happens
6:12
with this cat out of the way i am
6:14
absolutely set on the silver armor and
6:15
the colours that i've used to shade it
6:17
but i want to decide now on the trim and
6:21
the best way to paint the hazard stripes
6:25
a few people have suggested using a
6:27
pencil to make guidelines on
6:30
the yellow and as you can see here the
6:32
results weren't completely perfect but
6:35
they're way less fast than using the
6:38
tape which i definitely feel like i
6:40
struggled with
6:41
and as i'm going to be weathering these
6:43
stripes and cutting into them i did find
6:46
that as i painted over them with the
6:48
mechanical standard gray and then the
6:49
black templar i could just cut into them
6:52
to straighten them up and i think the
6:55
results afterwards look fantastic i use
6:58
the word fantastic rather loosely
7:01
by my standards i was pleasantly
7:03
surprised by your standards which are
7:05
probably higher than mine with all of
7:06
that fantastic painting experience you
7:08
have
7:10
and then i think this one was a tick
7:12
tock special and somebody
7:14
recommended paint markers or in this
7:17
case a gundam marker i was
7:19
pretty apprehensive about using these in
7:21
case they just sort of like spread
7:24
everywhere over the model and were
7:25
really messy
7:27
but it did turn out all right a little
7:30
tricky to get into some of the
7:31
hard-to-reach places and there were some
7:33
nib marks visible but they weren't too
7:36
bad in a pinch i think these would be
7:39
absolutely incredible for speed painting
7:41
hazard stripes in
7:43
no time at all
7:45
but they're not quite
7:48
the look that i'm going for with the
7:50
finish as it was i was covering it up
7:53
with black templar anyway so i think
7:56
it's gonna be pencil for the win and
7:59
sticking to
8:00
the hazard stripe method from juan
8:03
hidalgo i carried on with the hazard
8:05
stripes and i used some of the flavor
8:07
one flesh and that was definitely the
8:09
right choice to shade down and just make
8:11
that yellow a little bit more orange in
8:13
the shadows so now let's crack on with
8:16
the trim after the success of using
8:18
chrome model air
8:20
for the most part i bought some gunmetal
8:22
grey and not really learning anything
8:25
apparently
8:27
completely framed it all up
8:29
to add insult to injury i spilled a pot
8:32
of contrast everywhere
8:34
heresy for the emperor burn them all
8:36
deviant
8:38
i was trying to simulate using a dry
8:39
bush here trying to make small marks on
8:41
the trim
8:42
but overloading my brush just smudging
8:45
it everywhere when the contrast goes
8:47
over the top it just kind of looks like
8:50
budget tiger stripes
8:52
i did
8:53
a horrific job and this was a complete
8:56
waste of time
8:58
everything about this marine
8:59
unfortunately just kind of didn't work
9:03
so off to the stripping pile for him i
9:08
did however find better results with
9:10
balthazar gold shading it down with the
9:12
silicon grey i then highlighted it back
9:15
up with gold which i think might have
9:17
been slightly too bright but i'll
9:18
address that later on for now i'm just
9:20
going to shut up and crack on with
9:22
painting this guy
9:25
[Music]
10:25
so here we have it my completed marine
10:27
with most of my learnings from
10:29
everything i painted before it i tried
10:30
the verdigris again and i'm not sure i
10:33
could make it work
10:34
it kind of just looks like a blue blob
10:38
and lacks that variation that i managed
10:40
to get in the rust i'm trying to use
10:43
stippling techniques for these
10:46
if anybody has used the verdigris and
10:49
found it
10:51
and found a way to make it work please
10:53
let me know because i am not very good
10:55
and i don't know what i'm doing
10:58
anyway happy with everything else i
11:00
think it's right at the limit of what i
11:03
can paint having put all of the practice
11:05
in for it previously
11:07
perhaps i think i prefer the base from
11:10
the first marine the bigger cracks and
11:13
probably skimped on the iron earth and
11:16
put too much iron crust on this time
11:19
maybe
11:20
i think the rust looks cool shading of
11:22
the hazards happy with everything i feel
11:25
like before i finish this video and
11:27
settle on a final scheme for the
11:29
warpsmith i just want to address the
11:32
highlight on the trim as far as
11:34
sub-assemblies go for what i'm trying to
11:36
do and paint something that is is at the
11:38
limit of my ability
11:40
a full sub-assembly with all the parts
11:42
disassembled i think i'm really going to
11:44
struggle with where to put the
11:45
highlights where to put the shading
11:48
so something like this which is just in
11:50
a few parts
11:52
has done well
11:54
i wish with this guy that i've taken the
11:56
head off so body and backpack has won
11:59
arms and weapons as the other i think
12:01
that seemed to work okay
12:02
i haven't glued the arms on this guy as
12:05
putting them on i didn't want to smear
12:08
glue everywhere so i guess i've just got
12:10
a multi-pose model now
12:12
cheap man's magnetization
12:17
i know i've assembled more marines to
12:19
paint but i think i'm pretty much there
12:21
i just want to look at the trim i used
12:23
the gunmetal to base a spare miniature
12:26
and shaded it down with bacillicone and
12:28
gray like i've decided on and then on
12:31
separate parts of the model i put onto
12:32
the trim nasdrag yellow snaplike leather
12:36
bronze from pro acryl and then balthazar
12:39
gold
12:40
being able to look at the colors
12:41
together was actually really helpful and
12:44
i think i am fully in the balthazar gold
12:48
cap here
12:49
something about that warm
12:51
darker gold color
12:54
does just do it for me over the contrast
12:56
paints and over the bronze
12:59
so separately i painted up two shoulder
13:01
pads shaded them i highlighted one just
13:03
with valverde gold again and then
13:05
another with a balthazar and gold
13:08
mix i think i'm leaning towards the
13:10
darker trim i put a couple of spot
13:12
highlights on it as well
13:14
so there we
13:16
go and that is this video
13:18
done firstly i want to say a huge thank
13:20
you to the four creators whose tutorials
13:24
i followed in the last episode which
13:26
gave me the inspiration to start
13:27
smushing them together and make this
13:30
paint scheme i'm not going to take
13:32
credit for it it's all their hard work
13:34
and skill and i'm just sort of taking
13:36
little bits of it and smushing it
13:38
together like a child pete the wargamer
13:41
the painting coach duncan rhodes and
13:43
juan hidalgo go and subscribe to them
13:46
i'm sure you already are if you're
13:47
watching this but they're all great and
13:49
their work is fantastic and an equally
13:52
large thank you to you uh thank you for
13:55
watching and especially if you watched
13:58
the first episode uh there was loads of
14:00
nice comments on there and suggestions
14:02
of things that i should do i haven't
14:04
quite been able to delve quite as deep
14:06
into this episode because my work and
14:08
life have been
14:09
mega busy so i have had to flake out on
14:12
some
14:13
some bets someone suggested that i
14:15
should try and pay all the trim as a
14:17
hazard stripe which i thought for a
14:18
laugh could be quite funny but alas i do
14:21
not have the time very sorry anyway
14:24
thank you for watching thank you for
14:25
following me along on this silly little
14:27
journey and hopefully i'll see you in
14:30
part three where i begin to paint my
14:33
warpsmith
14:34
see you around
14:38
[Music]
14:44
[Music]
14:55
away
#Online Media
#Visual Art & Design
#Painting