Up next in 10


Head to https://squarespace.com/thepaintingphase to save 10% off your first purchase of a website or domain using code thepaintingphase
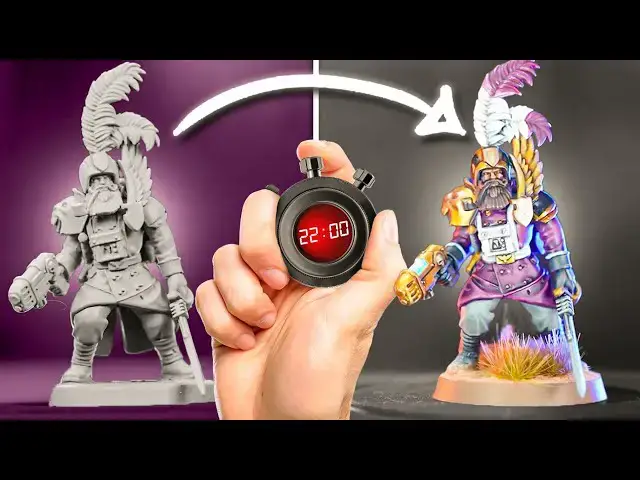
In this video Peachy faces the toughest of challenge, to paint a unit of imperial guard models that have been sitting on his desk gathering dust for around a year. Will he find the motivation to cure his hobby burnout? Maybe. Will he make sassy comments about brown vs black rims? Definitely.
Join our Patreon: https://patreon.com/thepaintingphase
Merch: https://thepaintingphase.creator-spring.com
Help Support the channel with our affiliate links:
UK & EU: https://affiliates.waylandgames.co.uk/idevaffiliate.php?id=1214
UK: https://elementgames.co.uk/?d=10835
EUROPE: https://taschengelddieb.de/?affiliate=tpp
US: use code paintingphase to get 10% off at https://www.goblinshut.com/
We Print Miniatures: https://weprintminiatures.com/thepaintingphase
THEPAINTINGPHASE for 10% off
Follow us:
https://www.instagram.com/thepaintingphase/
https://www.instagram.com/__peachy_tips__/
https://www.instagram.com/geoffsavory/
https://www.instagram.com/pileofshamepaints/
Show More Show Less View Video Transcript
0:00
this video is brought to you by
0:02
Squarespace
0:04
I'm certain at some point we've all had
0:07
that project where we spent ages
0:08
building it we're super excited about it
0:09
and then we just lose our Drive our mojo
0:12
or for whatever reason we shelve it and
0:15
it just becomes a glorified dust
0:16
collector while I had that with my
0:19
favored Army of all time that eventually
0:21
enables I spent ages converting some
0:23
death core Creek great coats look
0:25
awesome give them the heads built them
0:27
in ways that I can use them and kill
0:28
team as well and they look great got
0:30
more sprayed started paint them and then
0:32
just lost my drive and for ages I
0:34
couldn't quite work out why I couldn't
0:36
get back into it I know every time I
0:38
wanted to get back into it I did a bit
0:40
of color here and I just couldn't get
0:43
past this block of just not getting them
0:45
finished
0:46
and I used to give advice a lot to
0:48
people saying this is how you solve your
0:49
mojo problems you're tired of your desk
0:51
you do this did all those things
0:53
and I still just didn't want to finish
0:55
them and I and I boiled it down to one
0:58
thing
0:59
and the thing was
1:00
I did a 30 minute challenge for myself
1:02
and I painted eventually Noble within 30
1:05
minutes using a white undercoat and lots
1:07
of contrast and it looked Mega and it
1:08
was super efficient and super quick
1:10
and add these guys which are all Spray
1:12
Gray and they're a blooming chore to do
1:16
and I'm like I'm somewhere between the
1:17
two I'm like I know I can do this but I
1:19
can't do that with those now because
1:21
well they're all gray and someone got
1:23
paint on some are nearly finished and
1:24
some are finished and some are nowhere
1:27
near being finished so that was a thing
1:29
for me where I just lost my mojo and
1:30
just didn't want to touch him so I just
1:31
left them left and popped aside gather
1:34
dust been there for about a year my plan
1:36
I've got three groups in different
1:39
stages I've got some undercoated guys
1:40
I've got some guys that are pretty much
1:41
base coated with washes on and I've got
1:43
some with some colors on like a handful
1:44
so what I'm gonna do is I'm gonna get
1:46
the undercate ones up to the same point
1:48
that these three special weapons are at
1:50
then draw them all together as a group
1:52
and then continue with the next stages
1:53
and when they get to the same point that
1:55
the 10 are they've got like the base
1:57
coats on the shades I'll then I'll start
1:59
adding the rest of the colors as a big
2:01
solid group so they're all kind of
2:02
getting done at the same time and
2:03
hopefully with the way I highlight in
2:05
and I'm doing like many extra colors it
2:07
should tie them together as a unified
2:08
Force even if the jackets look slightly
2:10
different my first step over that
2:11
grounded coat is to get some warm gray
2:12
and dry brush that up that's just going
2:14
to help punch out some extra highlights
2:15
when I start applying some contrast and
2:17
other colors
2:18
foreign
2:21
[Music]
2:25
burgundy for all those tunics or great
2:27
coats and I'll start applying that over
2:29
I've thinned it down ever so slightly
2:30
I'm not using it straight from the pot
2:31
I've added a little bit of water to it
2:33
and I'll start going over all those
2:34
tunics and I'm not going to be super
2:36
neat here because I'll I'll be paint
2:37
over details so as long as it's on the
2:39
tunic I'm fine if I get on other areas
2:42
it'll be like armor not to bother
2:43
because I can paint over those and talk
2:44
about painting over some of those
2:45
details black Legion always a heavy
2:48
hitter when it comes to like covering
2:49
over details so anything that's black
2:51
like the armor the helmets leather
2:53
backpacks boots I'm gonna be using some
2:55
black Legion for that and even if I've
2:57
got any Sig Val burgundy on there it's
2:59
just going to coach right over it you
3:00
won't even see it now one thing to bear
3:01
in mind though is for the helmets and
3:03
the armor I'm going to use it straight
3:05
from the pothole neat if you like
3:06
however for things like the leather and
3:08
the backpack I will thin it down
3:09
slightly because that will help draw out
3:11
a little bit more of that gray and that
3:13
warm gray dry brush that we did as well
3:15
so you'll see a bit more of a difference
3:16
between the armor and the leather now if
3:19
any white details such as the feathers
3:20
or straps that little box on the front
3:21
for the gas mask I'm going to be using
3:23
white gray here I will need to do a
3:24
couple of coats especially around like
3:25
the belt areas because that Sig Val
3:27
burgundy will punch through a little bit
3:29
so you need to do a second coat it'll be
3:31
fine let's go to the pipe part it's
3:33
pretty he's pretty badass looking oh it
3:36
sounds like dragon is like really rugged
3:37
and like deep voice I think so yeah he's
3:41
got that Vibe I'm looking at him again
3:42
yeah this guy's got this guy's in
3:44
control
3:48
AKA chaps listen up return it again
3:50
we've got quite the big deal ahead of us
3:52
tomorrow
3:54
oh great we've drawn up the plans as
3:57
best as they can be planned the
3:59
strategies sound but you know what else
4:00
is sound that's right building your
4:02
first website with Squarespace
4:04
Squarespace what now I think he means
4:06
real space no chats Squarespace
4:08
Squarespace easily allows you to connect
4:10
your social media accounts to your
4:11
website displaying posts from your
4:13
social media profiles as well as
4:15
automatically pushing website content to
4:17
your favorite social media channels such
4:19
as the flamboyant feathers of ventrilia
4:21
also with automatic image scaling image
4:24
blocks automatically scale or fit images
4:26
to ensure they always look right
4:28
irrespective of their placement within
4:30
your content got a picture of the
4:31
emperor and want it displayed without
4:33
the distorting effects of chaos
4:34
Squarespace has you covered and not to
4:37
forget the function to sell your art on
4:38
an online store whether you sell
4:40
physical or digital Squarespace has the
4:42
tools you need to start selling online
4:44
and we all know our is killing the
4:46
enemies isn't that right chaps okay
4:48
chaps I'm glad that's all cleared up
4:49
tell you how uh what just happened I
4:52
think we're farther Thanos again so
4:54
let's go to squarespace.com for a free
4:56
trial and when you're ready to launch go
4:58
to squarespace.com forward slash the
5:00
painting phase to save 10 of your first
5:02
purchase of a website or domain now
5:05
moving on to the gold details I'm gonna
5:06
use some brass here yep I understand the
5:07
irony is called brass but it's the
5:09
closest to retributed armor and I don't
5:11
want to use that anymore I prefer to use
5:13
this uh it's quite Punchy but it ties in
5:15
quite nicely with the previous cars I've
5:16
done so I'm going to base coat over
5:18
those gold details just like the helmet
5:21
the gun as well I don't know if you get
5:23
on the barrel because we'll paint over
5:24
that later with some silver and you've
5:26
got like things like buttons to be a bit
5:28
neater with those get a nice pointy
5:29
brush and also we've got some gold trim
5:31
on somewhere you don't have to do the
5:32
gold trim if you don't want to but I
5:33
like to do it so if you are joining and
5:35
following this guide just get a nice
5:37
point to your brush doesn't matter if
5:38
you make this quite thick and chunky
5:41
because you can always get that black
5:42
Legion and cut back in and make it a bit
5:44
thinner if you need to so any mistake
5:45
you might get here as well with the gold
5:47
details is remember you got black Legion
5:49
to fall back on and tidy back on with
5:50
now the silver details I'm going to use
5:52
an oily steel here so on the barrels and
5:54
details on the gun I'm just going to
5:55
pick those out that's going over the
5:57
brass quite nicely anyway and then there
5:59
might be like some like little details
6:00
on these little gas mask control box on
6:02
the front as well so don't forget to put
6:04
those out and swords and blades and
6:05
things like that and bayonets of course
6:07
gonna have a nice shiny bayonet to stick
6:10
it in them now for the brown details
6:12
mostly beards to be fair
6:14
um there's probably not gonna be that
6:15
much of a brown unless you want to like
6:16
do like the odd Satchel here and there a
6:19
brown but for the Beards I'm also going
6:21
to paint the face at this point as well
6:22
so I'm just going to cut the whole lot
6:23
over with leather brown and it's on to
6:25
tie up the trousers I know I've used
6:27
obviously mechanical standard gray as an
6:28
undercape but I'm just going to tighten
6:29
up the trousers using graphite I'm also
6:31
going to pick out that bed roll as well
6:32
because you inevitably you're going to
6:34
get some purple or some white on it so
6:36
just tidy back up with those colors now
6:38
we use warm gray as a dry brush at the
6:40
start but I'm also going to use this to
6:41
pick out any parchment details so that's
6:43
like things like the maps the page on
6:45
the book if they've got any like Purity
6:46
seals you can also spruce up the hair
6:48
and have some hair that's not brown and
6:51
blonde or whatever then I'm going to get
6:53
no no and apply that all over the model
6:56
be mindful obviously with pool
6:57
especially around those robes because
6:59
you don't want it to be to be too dark
7:00
in some of those deeper recesses just be
7:02
mindful when it starts doing that now as
7:04
we were doing this we did have a video
7:06
call and there's a couple of that did
7:07
pull a little bit so I had to be a bit
7:09
more careful and just tidy some of those
7:11
back up but don't do what I do and just
7:13
ignore them check over make sure and
7:15
then get a brush dry it off and soak up
7:17
any excess with all those bits done it's
7:19
now time to pick out the skin now I've
7:20
got a brown undercoat there so I can
7:22
just pick out some of those raised areas
7:23
as you can see here you can leave them
7:25
Brown if you want to you can pick out
7:26
any kind of color I'm just using cork
7:28
because it I quite like it as a skin
7:30
tone I'm just going to pick out that all
7:31
in the faces don't need to worry about
7:33
the hands because they're gloves which
7:34
is great and then to just add a bit more
7:36
definition and just change the Hue
7:37
slightly of that cork I've used Raglan
7:40
flesh shade straight from the pot
7:41
because it's perfectly thinned I was in
7:43
two months to use golemen initially that
7:44
was on the script but because you can
7:46
thin that down as well but actually
7:47
rikling is just a perfect consistency so
7:49
I'll be using that all over the skin and
7:51
you don't need to do hands because
7:52
they're gloves so easy and cheap I know
7:55
I'm like that I don't like painting
7:56
hands throughout plasma weapons the
7:57
first thing I'm going to do is get some
7:58
white and just base coat you might want
8:00
to do a couple of coats of this
8:02
then after that I'm gonna get some blue
8:05
flu or fluorescent blue liquid pigment
8:07
and apply that over you might want to do
8:09
a second coat if you want a bit more
8:10
punch
8:11
and then just pick out those edges with
8:13
a little cheeky dry brush of white again
8:15
at this point everything is table top
8:17
ready I can play games with them I can
8:18
get them based and I'll be happy with
8:19
that I can do some kilting games and if
8:21
you really want to do some bigger games
8:22
like 40K or Crusade or whatever now
8:26
there is some inconsistencies at this
8:28
point some of the tunics are different
8:30
in tone I've got some Barack now
8:31
burgundy tunics done away I did some
8:33
Barrett now burgundy and some scream and
8:35
pink but with the new sick vowel
8:37
burgundy tones they are it there is a
8:38
little bit different but I'm okay with
8:39
that I made my piece of that as we said
8:40
at the start
8:42
the gold on the original ones as well is
8:44
slightly more orangey not as yellow as
8:45
the brass
8:46
now I know when the next steps which we
8:48
want to do now we're going to add some
8:49
love to them do some extra highlights do
8:51
some tidying up when I do that with a
8:53
brass on the existing ones and it's okay
8:55
to use different colors this is the
8:56
great thing as well as I'm not they
8:57
could be made from a different
8:59
manufacturer been distributed at a
9:00
different point but I know by layering
9:02
up at this point where brass will
9:04
actually tie them and uniform a bit more
9:06
because it's the similar tone so I'm
9:07
going to find when I go to this next
9:09
part where we start doing extra steps as
9:11
a unified Force they all look a little
9:13
bit more cohesive and as a as if it was
9:16
intended to be that way we all know
9:17
that's not the case because I lost my
9:20
mojo
9:21
but if someone liked down though I never
9:22
saw this video they'd be like oh they
9:24
look really cool and I think that would
9:25
be the point is with some highlights
9:26
even if it's a different company's brand
9:28
or you know some old paints or a
9:30
slightly different tone of gold you can
9:31
still draw them all together and try and
9:34
get a unified Force now for our next
9:36
steps the first thing I'm going to
9:36
concentrate on here is going to be the
9:37
tunic or the Overcoat or great coat
9:40
whatever you want to call it I'm going
9:41
to be using Violet red for this it's
9:43
very nice it's kind of like a warm
9:46
magenta kind of tone I know it says
9:48
violet and red but it's perfect for what
9:49
I need now I'm going to highlight mostly
9:51
unlike the raised areas like the folder
9:53
cloth but in some places I might layer
9:55
like the collar potentially or like some
9:57
larger areas of the cloak if I need to
10:00
um but yeah this is going to help tile
10:01
those guys together now by using this
10:03
one color across the whole lot for our
10:05
white sections I'm going to highlight
10:06
back up with the same color we use as
10:07
the base coat which is white gray
10:08
because we've used some non oil it's
10:11
ever slightly changed the tone of it so
10:13
just using that initial base case what I
10:15
call a tidy up stage but I'm actually
10:16
Edge Highline with it it's just it's one
10:18
less paint to worry about you've already
10:20
used it and it does add a lot of punch
10:22
once it started to be highlighted as you
10:24
can see then use some graphite again
10:27
this is layering back up with the color
10:28
we used previously for like the base
10:29
coats and I'm going to highlight the
10:31
edge of the black leather so this is
10:32
things like the backpack
10:34
um like bits on the boots like the
10:36
little putties and stuff like that and
10:37
also I could tidy up the trousers as
10:39
well at the same point so I can
10:40
highlight them so again it's the same
10:42
color even though I've used that non-oil
10:44
it's changed the tone meaning the base
10:46
coat it can just be used again as a
10:48
highlight then onto the flesh I'm going
10:50
to tighten up the skin using Cork and
10:52
some places after that I'm gonna get
10:54
some radiant flesh and highlight up as
10:56
well mainly can be cheeks and nose don't
10:58
go mad the great thing with some of the
11:00
models they've got so much beard and
11:02
like mustache that you only like picking
11:04
out the nose and maybe a cheek if you're
11:06
lucky so it's great using these heads
11:08
because they're just covered in beards
11:09
fantastic now for my command group what
11:12
I'm going to do here is I'm going to
11:13
signify them as the command and I've
11:14
done this in the past for my venturian
11:16
Nobles where I've used a magenta color
11:18
on the actual tips of the feathers
11:20
everyone else has white feathers apart
11:22
from the command that have like a little
11:23
bit the top that's magenta and I'm going
11:24
to do that with a Five Command group
11:27
um it's really quick I'm just using this
11:28
thing about burgundy because of all that
11:30
white we've done underneath that's going
11:32
to actually add as a highlight as well
11:33
so I'm not going to do anything other
11:34
than thin down some sick about burgundy
11:35
and slap that in a nice pattern on the
11:38
top of the tip of the feather
11:41
make him look smart then it's time goal
11:43
time so that's on pretty much anything
11:45
that's gold if you wanted to the buttons
11:47
probably won't need it but things like
11:48
the helmet uh shoulder pads potentially
11:51
the gun certainly definitely on the
11:53
original 10 I've done uh that's going to
11:55
help draw them into the newer ones and
11:56
I'm gonna get some silver and type the
11:58
silver details only a little bit here
11:59
and there so a little bit of barrels
12:00
needed picking out the uh the bayonets
12:03
and the swords as well
12:04
on the officer here I decided to
12:06
actually Edge highlight some of those
12:07
gold details as well I'm probably not
12:08
going to do this on all the guys maybe
12:09
like the sergeants and like the officers
12:11
but everyone else is just going to be
12:13
left as it is
12:14
and then it's time to get some hard coat
12:16
now when I'm doing the hard cut I use
12:18
this for the lacket armor I thin it down
12:20
slightly a bit of water it's fine it
12:22
won't be so streaky I also added to some
12:24
of the gold sections especially around
12:25
the helmet so I don't have to be like
12:26
super neat about it but it does add a
12:28
bit more bling to that gold so you get a
12:30
bit more punch out of it so when you do
12:31
like the shoulder pads you've got that
12:32
gold trim just go over the gold trim
12:33
it'll be fine number eventually Nobles
12:35
originally have been based using
12:37
Armageddon dust and I've used some ripen
12:39
fleshade and dry brushed it with a bone
12:40
I refuse to use Armageddon dust now
12:42
because it's you get hard to get any of
12:45
it most of them are dried up and I just
12:46
want to use some of the new AK stuff
12:48
because they're huge tubs
12:50
however none of them look like
12:52
Armageddon dust or do they well actually
12:55
by adding some of the liquid pigments
12:57
over the top they do so what I'm going
12:59
to do is get some dry ground I'm just
13:01
going to apply that all over the bases
13:02
usually like I do I tend to thin it
13:04
round a bit around the edge and then
13:06
just pull it on and then I'm just going
13:07
to use some of those liquid pigments and
13:08
dry brushes and I found something that's
13:10
very close if not almost identical so as
13:13
I said I'm using dry ground here for the
13:14
base texture and as always I like to
13:16
thin it down just around the feet so I
13:18
don't get like too much like chunk
13:19
around those and then it was swamping
13:21
them and once that's all applied and I'm
13:23
just going to get it neat and then just
13:24
start doing like bigger blobs and
13:26
that'll just add to that texture also at
13:28
this point I want the boots to look
13:30
dirty so what I'm going to do is get
13:31
some of that dry ground and I know it
13:33
sounds mad but I'm going to get an old
13:34
brush and I'm going to dry brush
13:36
somewhere because it's the right color
13:37
and a driver some of that over the the
13:39
bottom of the boots I've also not
13:41
highlighted the boots as well at this
13:42
point so don't bother highlighting your
13:44
boots I probably should have said that
13:45
earlier but don't bother highlighting
13:46
boots because you can get them caked in
13:47
dirt anyway so I'm just going to dry
13:49
brush this round
13:50
and then that'll just give it that kind
13:51
of old dusty Caked Up feel now next I'm
13:54
going to use one of those liquid
13:55
pigments and this is light clay it's
13:56
kind of somewhere between raccoon
13:57
fleshade and the tone of like monfang
14:00
brown
14:01
um but because it's quite thin you can
14:03
have more control over it you can add a
14:05
couple of layers you can thin it down if
14:06
you need to so what I'm going to do is
14:08
apply that over and when it dries it
14:10
should make this base look a little bit
14:12
more like how my Armageddon dust bases
14:14
were done with a Raglan fleshy shade
14:16
over it so I'll have a similar finish
14:18
and with that done I'm just going to dry
14:20
brush though using some pale sand
14:22
previously I'd use screaming School pale
14:24
sand is what I like to use now because
14:25
it's nicer with the base textured our
14:27
dry brush I'm just going to get a couple
14:28
of Tufts these are the closest ones I
14:30
can find that match with the older style
14:32
Citadel tough so they don't do them
14:33
anymore which is weird that they don't
14:35
make newer versions of the Tufts of the
14:37
same color of the old ones I don't
14:38
understand why they're completely
14:39
different colors but
14:41
um a who cares I'm using some Army
14:43
painted ones here so they're as close as
14:44
I can get which is great and then I'm
14:47
just gonna Rim the base using steel
14:49
Legion drag but now I'll do three coats
14:51
of thin down steel drab I know there's a
14:54
war out there between black rims and
14:56
brown rims but
14:57
I think you'll find I'm winning
14:59
everything is now painted and based and
15:02
I am super pleased they look consistent
15:05
at a glance close up you will see some
15:07
differences but you know what I'm okay
15:09
with that and I've mentioned my reasons
15:10
for that you know different equipment
15:12
different lengths of service they can
15:15
have a slightly different tank and it
15:16
does look a bit more ad hoc and feels
15:17
right for kill team in 40K now the big
15:20
thing for me was I got past my block
15:23
after I everything was base coated and
15:25
washed and I was normally I'll be like
15:27
oh I've got all highlighted to do now
15:29
it's going to take ages but my mojo came
15:31
back once they're all base coated
15:33
they're all washed and it looked more
15:35
unified which kind of brought the
15:37
enthusiasm back it reinvigorated my need
15:40
to want to get them done I just was more
15:43
excited about this this platoon now that
15:46
they're all like kind of Base coated and
15:47
shaded so my sort of what would have
15:50
been like oh I've gotta highlight
15:51
everything was gone I wanted to get him
15:53
highlighted I want to get him finished
15:54
because I want to get on the tabletop
15:55
because they look Mega I know they're
15:56
going to look Mega because they're all
15:57
pretty too much there and that's
15:59
something I think
16:00
as advice on this video the story I've
16:03
gone through which is I've had these
16:04
guys Gathering dust for over a year on
16:06
my desk and just never wanted to get
16:08
around to painting because I just there
16:10
was always something else to do there's
16:11
always something more fun to do and once
16:14
I got past those Scruples of like you
16:16
know what it doesn't matter if they're
16:17
slightly different colors and here's a
16:18
different approach yes I could use this
16:20
color scheme or I could go the old way I
16:21
did them but I didn't I just went sod it
16:25
just get them done I've now got 25
16:27
figures I can use in a game as opposed
16:29
to 25 figures Gathering dust at
16:32
different points of being painted and my
16:34
advice to you guys at home is if you do
16:36
suffer from this and you have got stuff
16:38
on the table top try and find a
16:39
different approach try and roll back
16:41
maybe your standards or don't worry so
16:44
much about it being so consistent or no
16:46
the equilibrium inside of you just let
16:49
it go get that thing done because what's
16:51
better than having something not paint
16:52
on a shelf is something where you're
16:54
like
16:55
done oh well I'll cut some corners and
16:58
having something painted that you can
16:59
play games with and that's what I found
17:01
with this unit as always thank you for
17:02
watching don't forget to hit the like
17:04
And subscribe and a massive thank you to
17:05
our patrons without you guys we won't be
17:07
able to do this we'll be able to have
17:08
this kind of fun we'll be able to get my
17:09
guys painted and you know do up for you
17:12
guys to see the Journey of peachy like
17:14
getting past his loss of Mojo So as
17:17
always you're amazing great community
17:19
and if you want to be part of that join
17:21
our patreon many tiers many benefits I
17:23
love you all and I can't wait to see you
17:26
in the next one uh Stay classy you
17:29
awesome people
#Online Media
#TV & Video