Up next in 10


Skip the prep and get gaming straightaway with Tenfold Dungeon: https://tenfolddungeon.com/
This is the last painting video Peachy filmed with the painting phase. Please go and subscribe to his new channel @PeachyTips
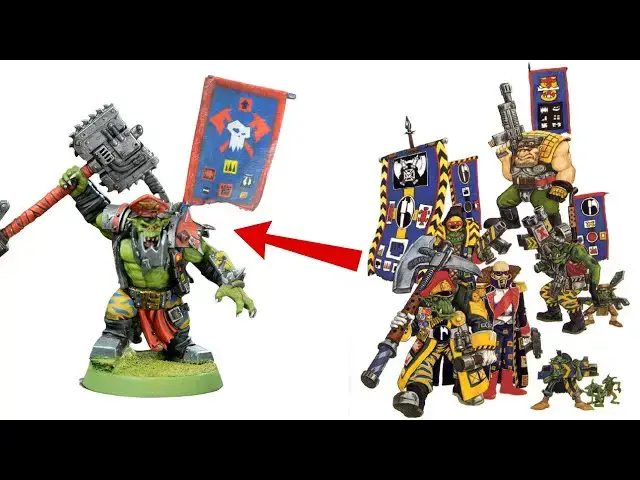
Watch Peachy create a custom kill team from some classic Blood Axe art.
Join our Patreon: https://patreon.com/thepaintingphase
Merch: https://thepaintingphase.creator-spring.com
Streaming: https://www.twitch.tv/thepaintingphase01
Help Support the channel with our affiliate links:
UK & EU: https://affiliates.waylandgames.co.uk/idevaffiliate.php?id=1214
UK: https://elementgames.co.uk/?d=10835
EUROPE: https://taschengelddieb.de/?affiliate=tpp
US: use code paintingphase to get 10% off at https://www.goblinshut.com/
Gaahleri airbrush: https://www.gaahleri.com/?ref=Thepaintingphase
We Print Miniatures: https://weprintminiatures.com/thepaintingphase
THEPAINTINGPHASE for 10% off
Show More Show Less View Video Transcript
0:00
this video is sponsored by Gale for 9
0:02
and their tenold dungeon terrain kill
0:04
team is a great way to delve into the
0:06
peripheral side of Warhammer 4000
0:08
whether that be inquisitorial War bands
0:10
Rogue Traders eldari Pirates beastmen or
0:13
ad hoc collections of Space Marines
0:16
however for me it allows me to scratch
0:17
those hobby itches for things I might
0:19
not have time to do whether that be from
0:21
a cool piece of art or some really cool
0:23
War band or character full unit from a
0:26
black Library novel now in regards to
0:28
Kit bashing and painting The Kill team
0:29
that's Fe in this video it's based off a
0:31
piece of art that I saw once when Louise
0:33
was showing me the ear we go supplement
0:35
from back in the day and there's a
0:37
really cool piece of vignet art of the
0:39
blood axes and I always looked at that I
0:40
always thought I painted enough Orcs in
0:42
my life that I don't really want to do a
0:43
whole Army of them I've got my issues
0:45
with Orcs we all know this I've talked
0:47
about this at length on many many things
0:48
like chat shows or even on this
0:50
particular style of video however seeing
0:53
the blood axis in this vignette it's
0:55
stuck with me for quite some time and
0:57
then Pat was like we need to do a kill
0:58
team I was like cool let's do a kill
1:00
team let's do the blood ax kill team
1:02
let's kit bash it and try and make it
1:04
look like this piece of art so I'm very
1:06
excited about giving this a go and see
1:08
what we can do so first up is to
1:10
actually build and kit bash the blood ax
1:12
War band now there's a couple of things
1:13
I really like about this war band there
1:15
is a human advisor which is insane and I
1:17
like the idea of this there's an augin
1:20
uh which again working for Orcs feels
1:22
weird but also I really like the back
1:24
banners as well that kind of sashimono
1:26
feel that you see with the Orcs And it's
1:28
very retro very classic so I do like
1:30
that so they're going to be things I'm
1:32
really going to look forward to doing in
1:34
this video so we're going to just crack
1:35
open our load of bits and then get
1:37
started making this kilty first up is to
1:40
build the knob then add bits to make him
1:42
look kind of like the art so for this
1:44
I'm just going to build it straight from
1:45
the set as you can see we've got an orc
1:47
boy set and we're just building the knob
1:49
as is now I want a peak cap for my knob
1:52
however I've also got this plastic
1:54
commissar set who has a giant Peak cap
1:58
on it so I will be using this set set
2:00
but not with a peak cap so what I'm
2:01
going to do is Nick that for my knob so
2:03
all I'm going to do is cut that out now
2:05
when I was cutting this out it was dead
2:07
easy just to assemble the two bits with
2:08
the kar's head however when I was trying
2:11
to cut it off on screen it kind of got a
2:15
bit weird and mushed up so I had to take
2:16
it away from screen and then do it quite
2:18
gingerly with a knife off screen so I do
2:20
apologize for that you won't see that
2:22
being happen cuz I nearly ruined it and
2:23
I've only got the one so the not built
2:25
it made sense to build his hum advisor
2:27
again I'm just building this guy as is
2:29
the only difference is I'll be using a
2:30
different head now I have lots of Jean
2:32
Steeler Cy stuff at home however
2:34
searching through my bits I found one of
2:35
the Riders from the atan jackals that
2:37
looked almost perfect as a match to the
2:39
one in the art so I'll be using him now
2:42
it's not a perfect fit as you can see so
2:44
some clipping and trimming is required
2:45
to make it fit f and cut it to fit don't
2:48
forget to follow down that cranial Ridge
2:49
too cuz I almost forgot that so it end
2:51
having a weird gin to the co look to it
2:53
next up was to build the augin now I had
2:55
a couple of options here option one was
2:57
to build the necrom slave Ain with a
2:59
powerful and Spud Jacker pretty much as
3:01
it is in the instructions however I
3:04
quite like the idea of giving him a big
3:05
gun now I didn't have any asarum Ain I
3:09
only had spare bits on those but however
3:11
with a little bit of a kit bashing with
3:12
some of those parts and the slave augin
3:15
I decided to go with that option and
3:17
give him a frag Cannon or frag launcher
3:19
whatever it is instead of the Power Fist
3:22
and the other thing as well is it felt
3:24
more right and unique to that look so it
3:27
didn't just look like a repainted slave
3:29
next was to build some Orcs I'm just
3:30
going to assem them as they are I only
3:33
need a few for this kill team I've
3:34
already got a test model which counts as
3:36
number four so I'm just going to build
3:38
three for this and then get them painted
3:40
up in a bit next up is to make the bat
3:42
banners now for the bat banners I'm
3:43
going to be using some paper clips or in
3:45
some places if you don't have paper
3:46
clips you can also use some brass Rod as
3:49
well initially I started using paper
3:51
clips but I found brass Rod is actually
3:53
better cuz I can cut it to length I
3:55
don't have to worry about it just being
3:56
a limited size which is unfortunately
3:58
what you get with Paperclip clips now
4:00
once you've got your brass Rod or your
4:01
paper clip to the length you want it to
4:03
you do need to bend it a little bit to
4:05
make a nail shape using brass Rod is
4:07
perfect for this because you can have
4:08
excess so you you don't have to worry
4:10
about you know there being not enough
4:12
length on the height or on the vertical
4:14
or on the horizontal or whatever so
4:16
using brass Rod means you can make it a
4:18
little bit more proud and then trim it
4:19
down once you get all your tape on
4:21
there next up is the teror length of
4:23
tape and stick it to a cutting mat and
4:25
then I'm going to do is just draw out
4:27
one little corner these tabs so the
4:29
vertic and the horizontals are just
4:30
going to fold around onto that brass Rod
4:33
or that paperclip and it kind of gives
4:35
that sense of like rough stitching so
4:37
all I'm going to do is just cut out a
4:39
little corner and then flip the tape
4:41
around so the sticky bits now facing
4:42
upwards get my little upside down L
4:45
place that on the top and then just fold
4:47
those tabs over if you can roll them
4:49
under using a knife or I don't know like
4:51
a file or something like that pointy
4:53
that actually helps to it just to adhere
4:56
underneath um doesn't matter if you
4:58
can't it's not the end of the world you
4:59
can always drop a bit super glue in
5:00
there as well but don't worry it does
5:02
feel tacking sticky right now but once
5:04
you spray it that'll all be gone so do
5:06
not worry about that and like I say it
5:08
does look rudimentary but it's very ory
5:10
and that's what matters then after that
5:12
once I've got a few of these back
5:13
banners made just going to drill the
5:15
hole into the backs of my Orcs now some
5:17
it's perfect cuz they have these little
5:18
round sort of like armor plates on the
5:20
back so you can just drill behind that
5:22
with the orc boss he didn't have that he
5:24
just had like his big sort of holster of
5:26
a gun in it so again talking about the
5:29
Dilemma of earlier about do I cut off
5:30
that boss Pole or don't I so I just
5:32
thought i' just stick it to the side um
5:34
the last thing you want to do is just
5:35
looks like they've had a hole in the
5:36
back and they've been in pil by it
5:38
doesn't look right so if you can hide it
5:39
around something looks
5:41
better tfold dungeon is modular RPG
5:45
terrain that is designed to make your
5:46
gamees nights easier and quicker than
5:49
ever before skip the prep making setting
5:51
up and breaking down your terrain
5:52
achievable in just a couple of minutes
5:54
everything packs away into the box so
5:56
storage is easy and taking it to a
5:58
friend's house for gaming his is easy
5:59
than never before they even fit into a
6:02
motorcycle top box the new wave of
6:04
10-fold dungeon sets include four new
6:06
Sci-Fi settings to add to the previous
6:08
four fantasy releases the Sci-Fi
6:10
dungeons aren't just for RPGs they're
6:12
perfect for games like kill team
6:13
necromunda Infiniti and Star Wars Legion
6:16
you can even use it for AOS or 40K as
6:19
you can get a good table of terrain I
6:20
use it for war cry loads and it's great
6:22
fun and quite violent the dungeons are
6:24
made to last with durable card stock
6:26
designed for use after use so click the
6:29
Link in the description to skip the prep
6:31
of your games night and get yourself
6:33
some 10-fold dungeon terrain so I've got
6:36
the kill team built up there's about six
6:38
figures plus the seventh which was the
6:40
test model now one thing I I am going to
6:42
try and do is try and keep the paints to
6:44
a minimum so there's going to be like a
6:46
red a blue a green a yellow and then
6:48
there'll be a little bit of mixing here
6:49
and there but we're going to start off
6:51
first by just getting up to like a
6:52
tabletop standard and then we'll add
6:53
some extra steps later on but first of
6:55
all let's get on with those base coats
6:58
so I started off with a xandre dust
7:00
undercoat I mean if you don't have
7:01
xandre dust you can just do gray
7:03
whichever works for you and I've used
7:05
golden Olive as a base coat so again you
7:07
can be really untidy here just get that
7:10
all slapped in um because you can always
7:12
obviously build up those layers with
7:14
paint That's the great thing about paint
7:15
you can coat over it it's great so just
7:17
do a couple of coats of golden Olive
7:19
once you've done that I'm then going to
7:20
get some Sponge into one of the Little
7:22
Brush sleeves thank you Darren lean for
7:25
showing this great technique and then
7:27
I'm just going to just sponge on some
7:29
lighter green which is going to be lime
7:31
green I'm just going to sponge that on
7:33
now here I used two greens cuz I wanted
7:34
to have like a little bit of definition
7:36
for the orc skin but you could always
7:37
just add a bit of yellow to your golden
7:39
Olive if you really wanted to so just
7:41
sponge that on now there's two things
7:43
this is going to do it's going to give
7:44
it a bit of a a layered highlight but
7:46
it's also what I want is a nice sort of
7:49
leathery skin texture which is very
7:50
reminiscent of orc skin so it's got a
7:52
bit of texture to it next is to perk out
7:55
the yellow trousers and for this I'm
7:57
using Sahara yellow again even though
7:58
I've got Andre dust as an under coat I'm
8:01
just going to do a couple of thin coats
8:02
just so I don't clug up the detail and
8:03
it's not too streaky and it's picking
8:05
out any red details mostly the Red Top
8:08
um so I'm just going to get some blood
8:09
red for that and again couple of coats
8:11
of that as well now for the black
8:12
details I'm going to use black Legion
8:15
thin it down a little bit and I'm going
8:16
to do this over anything I want black
8:18
but also anything that I want metallic
8:19
as well because it's just going to go in
8:21
the cracks and I don't have to be as
8:23
fastidious when I'm doing like the
8:25
silver details or the gold details cuz
8:27
it's all black in the crack so I don't
8:28
have to worry about it so if you want to
8:30
don't have to do this option for the
8:32
metallics but it's recommended I'm going
8:34
to pick out the blue back Banner uh
8:36
using ultramarine and also the camo
8:38
pattern as well again a couple of coats
8:40
on the back banner and a camo pattern
8:42
you could probably do a coat and then in
8:43
some places a little bit here and there
8:45
as a second coat but not you don't have
8:47
to go mad with a camo any silver details
8:49
I'll be using oily steel again cuz I've
8:52
got all that black over there I don't
8:53
have to be as neat I can just like go
8:55
over the raised areas and it's all black
8:56
in the recesses so it kind of saves you
8:58
a bit of effort I'm going to use grimy
9:00
gray out I'm going to use this for any
9:01
bone and teeth as well as any
9:03
fingernails cuz they got quite sharp
9:05
little fingernails these dudes have and
9:06
I'll be using old gold for any gold
9:08
details there's not going to be a lot of
9:10
that mostly unlike the human advisor I
9:12
there was a couple of gold details but
9:14
I've got the cat badge for the boss and
9:17
also his big belt buckle with a fist on
9:19
it and it's my favorite part getting
9:21
some Black Knight thinning it down a bit
9:23
and then just drenching it over the
9:25
model now this is a really good wash or
9:27
shade from AK because it's quite viscous
9:30
as well so it does take its time to dry
9:32
but it gives a bit of a blend you can
9:33
thin it down a bit more where the skin
9:35
is so you can have it a bit lighter but
9:37
it gives you a nice transition and I
9:39
really like the effect of it so our
9:41
models are now tabletop ready they've
9:42
been base coated and shaded so you could
9:44
just base them and play games them till
9:46
the end of time and not worry about any
9:48
adding any details that's entirely up to
9:49
you what I'm now going to do is move on
9:51
to some extra steps so this is going to
9:52
be doing some Tiding up so that's just
9:53
relaying those base coats and then doing
9:55
some highlighting if you wanted to add a
9:57
bit more punch to the whole kill team or
9:59
just the commander it's entirely up to
10:01
you so the first part of our next step
10:03
is just to tidy up those base coats so
10:05
that's just TI up a bit of the skin Tien
10:07
up a bit of the yellow tighten up a bit
10:08
of the going over the black a couple of
10:10
times if you think it needs a bit more
10:11
depth also reti up the blue so you
10:14
literally just going around tying up
10:16
those base coats and what this is doing
10:18
is it's giving you an extra layer of
10:20
tone even though you've just used two
10:22
paints you used a paint and a shade
10:23
using that same base coat paint again to
10:26
give you almost a third transition if
10:27
you like I'm Al going to add some of
10:29
those colored sections like the yellows
10:31
or the Reds onto any bare metal areas
10:34
just to look a little bit more like
10:36
painted metal that's chipped up the
10:38
edges so I'm not going to go all the way
10:39
to the edge uh and then what that does
10:41
is it saves you I'm highlighting it and
10:43
it kind of looks highlighted but also
10:44
chipped at the same time so I've done
10:46
this on the boss with some yellow bits
10:48
on his fist and obviously some red on
10:51
his shoulder pads as well you can do
10:52
whatever colors you want to it's
10:53
entirely up to you I'm going to mix in a
10:56
little red to the green now normally
10:57
when you mix red and green together it
10:59
kind of gives you a bit of a muddy Brown
11:00
effect but if you use more red it's kind
11:02
of give you more of an earthy pinky red
11:04
and I'm just going to use this for the
11:05
tongue and lips I'll do this on all the
11:07
dudes but obviously we're just painting
11:08
the uh the boss at the moment so just
11:10
get that tongue painted and also I'm
11:11
going to pick out the knuckles as well
11:13
cuz it looks like he's been punching
11:14
grots loads of GRS or maybe some Orcs as
11:17
well then I'm going to highlight the
11:19
skin with lime green again just picking
11:21
up those raised areas take your time
11:23
work your way around in some place you
11:25
might want to layer some places you
11:26
might want to do an edge highlight
11:28
mainly around the face cuz it's very
11:29
characterful after we've highlighted our
11:31
skin we're now going to move on to
11:32
highlighting the red you can also use
11:34
this for the eyes as well so you're just
11:35
going to get some burn red and we're
11:36
just going to pick out some Edge
11:37
highlights on all those red details
11:39
again you don't have to go too mad just
11:41
picking out some raised areas here and
11:42
there now some colors I don't have any
11:44
light Grays or light yellows so what I'm
11:46
going to do here is I'm going to use
11:47
grimy gray and I'm going to mix that
11:49
into the yellow first so it's going to
11:51
give me more of a pale yellow so I can
11:52
highlight any yellow areas so I'll do
11:54
that first and then once I've done that
11:56
I'm then going to get some grimy gray
11:58
and add that in into the black which
11:59
will give me a bit of a midtone gray
12:02
again it doesn't have to be precise
12:03
you've got a kill team of like seven
12:05
figures if you're using a wet palette
12:06
that should probably stay wet enough for
12:07
all of them or it doesn't matter if it's
12:09
slightly different between character and
12:11
character so it's fine just mix in 50/50
12:13
of each and you should get a nice mid-
12:15
gray I'm just going to go around and
12:17
then just do some Edge highlights over
12:18
his jacket and make it look a bit torn
12:20
and battered for our humi advisor what
12:22
we're going to do here most of them has
12:23
been painted following the rest of the
12:24
guide so all we're going to do is give
12:25
them a little camo pattern as you see on
12:28
the art which is some little yellow
12:29
squares with like what is supposed to be
12:32
a smaller Red Square in the middle but
12:33
I'm just going to do a red dot so I'm
12:34
going to do is make a little pattern of
12:36
yellow squares along his trousers and
12:39
then once that's done knat up with a bit
12:40
of blue just in case they've gone a bit
12:41
wibbly wobbly with some of the lines and
12:43
then just put some red dots in it and
12:45
then I've got myself some really garish
12:47
human camo for this poor advisor what is
12:50
he doing some weird Life Choices this
12:53
guy made don't know what he's doing now
12:55
for our orc skin we're just going to use
12:56
the same way I've done the human skin
12:58
and that is using cork couple of Base
12:59
coats of that so take your time build up
13:01
a couple of layers get some of that
13:03
black knight like I've used across
13:06
everything else thin it down coat that
13:07
over if you don't want to do this you
13:08
can always opt for some different shades
13:10
I'm just using Black Knight CU that's
13:12
the shade I've used in this video so
13:14
just coat that all over again thin it
13:15
down a bit and then tide it back up with
13:17
some cork on those raised areas and then
13:19
again get some grimy gray mix that into
13:21
your flesh and you got yourself a nice
13:23
highlight as well and you can
13:25
progressively mix grimy gray into that
13:27
flesh tone to make it lighter and
13:29
lighter and lighter if you want to do
13:30
more and more highlights on there as
13:32
well don't go too mad though you don't
13:33
want it to be too sort of bony on the
13:36
corners to you I I I would't do it then
13:39
so I've got our models base coated
13:40
washed and highlighted they're ready for
13:42
the tabletop but the next step that I
13:43
want to do is add some love to those
13:46
back banners and I'm just going to get a
13:47
load of glyphs cut out a load of like
13:49
blood axe decals put them on some tissue
13:53
Dows that in water so it's nice and
13:55
Soggy that tissue is so it's just going
13:56
to help those decals lift off the back
13:58
of paper and then get some hard coat
14:01
whilst that's happening onto the actual
14:03
back banners that will make it easy to
14:05
apply these you can maneuver them around
14:07
they're not going to get like stuck on
14:08
the coarseness of that um masking tape
14:11
texture so once you got some hard coat
14:13
on there let it dry and then it's just a
14:15
matter of placing down your decals where
14:17
you want them to there's no right or
14:19
wrong way I'm kind of using the art as a
14:21
guide so I'm doing like a nice Glyph of
14:22
the blood axis then underneath it do
14:25
lots of little ory glyphs sometimes in
14:27
square patterns sometimes in columns
14:29
doesn't really matter it's entirely up
14:30
to you for the orc knob as well I'm also
14:32
going to do on his jacket cuz he has
14:34
some glyphs on his jacket around the
14:35
sides and I thought that looks quite
14:37
cool I'll just add that to his jacket as
14:38
well so just work your way around and
14:41
again had to gloss his jacket just so it
14:43
made it easier so once you've done that
14:45
across every single character in your
14:47
kill team whether that be the human
14:49
advisor I don't think I added into him
14:51
anyway but the augen I definitely did um
14:53
once that's all done we're then going to
14:55
get some of that black knight thin it
14:57
down cuz it's super matte and then just
14:59
paint over everything most of those back
15:00
banners but also anywhere else you might
15:02
have put a decal and then that's going
15:04
to do two things it's going to Matt it
15:05
down so there's no shiny film showing
15:08
through and also it's going to make it
15:10
look a bit dirty which is kind of what
15:12
you want and as it dries and pulls down
15:14
to the back banet it kind of looks like
15:16
it's bit scorched and burnt and battle
15:17
worn as well so you're getting quite a
15:19
few effects just from one little wash
15:21
which is really really good and now to
15:23
finish our orc kill team off just to
15:25
make him look bit more retro cuz we got
15:27
some bright tones here already first of
15:29
all I'm going to get some sand I'm going
15:30
to apply some super glue to the base use
15:32
one of the paper clips or brass Rod bits
15:34
youve got to maneuver it around and then
15:36
just submerge that into some sand I'm
15:39
just using some Army painter cor sand
15:41
here so I'm just going to submerge it
15:43
into that let it soak up move it a
15:44
couple of times you might need to wipe
15:46
your finger around the rim a little bit
15:47
here and there cuz you might get some
15:48
granules of sand on there by accident or
15:50
some super glue so now we're going to
15:52
move on to painting the bases and for
15:53
this I'm going to start off with golden
15:55
Olive cuz it is going to give you that
15:56
retro gobling green Vibe it's not an
15:58
exact replication of goblin Green but
16:00
it's close gives you the look so I'm
16:02
going to thin that down first of all
16:03
because I'm using water to thin this
16:05
down sand is quite good at soaking up
16:07
water even though I've had some super
16:08
glue there so that's going to soak and
16:10
make it easy to apply so I'm going to do
16:11
a couple of coats of that over the top
16:13
and then of course a few coats around
16:14
the edges to rim That Base as well and
16:17
just build up that gobling green or
16:19
golden Olive effect and of course
16:21
classic style Workshop gobling green
16:24
bases used to be dry brushed with
16:26
sunburst yellow um we don't have that
16:28
we're just going to use that Sahara and
16:29
yellow I'm just going to do a nice
16:30
subtle dry brush over that texture and
16:32
again to give it that nice yellowy
16:33
highlight that's reminiscent of goblin
16:35
Green bases there we are our blooda kill
16:38
team is now done they've got goblin
16:39
Green bases which just gives them a nice
16:41
retro classic look and honestly I
16:44
actually really enjoy doing this I I
16:45
normally avoid painting Orcs mainly
16:47
because I've painted so much for GW over
16:49
the years and I hate painting green skin
16:50
but I really enjoyed this I think adding
16:52
that retro sort of vibe to it as well as
16:56
going like just cool kit bashes getting
16:59
some humans and like I said before I
17:01
really like that piece of art and
17:02
getting that opportunity to turn that
17:04
into a kill team it's it's been a really
17:05
fun project in hindsight I might have
17:07
done a few things a bit differently may
17:09
have punched the green out a bit lighter
17:11
because it kind of clashes with the
17:12
goblin Green bases ever so slightly
17:13
because I've used the same color as the
17:14
base coat um in hindsight I probably
17:17
should have done all the decals before
17:20
shading the entire models just to cut
17:21
down on like drying time um but I'm
17:24
happy enough with the kit bashes I
17:26
really like the final look and just
17:27
sticking loads of glyphs on looks really
17:28
really cool so if you've got any ideas
17:31
or things that you want to do and you
17:32
think oh it's going to be quite hard to
17:34
Kit bash that don't don't let that stop
17:35
you just you know be inspired by it it
17:38
doesn't have to be an exact replication
17:40
this isn't exact to the art it's
17:41
inspired by the art um and I'm still
17:44
getting the beats and the hits from it
17:46
cu the color scheme's similar the camo
17:48
similar the bat Banners are similar so
17:50
I'm still getting that nice nostalgic
17:51
hit of seeing that art in this kill team
17:54
so you don't have to make it like
17:56
verbatim you can always just
17:59
get the the nuance and the inspiration
18:01
of it um I hope you've enjoyed this
18:03
video I've had a lot of fun doing the
18:05
kit bashing and the painting I was
18:07
surprised actually I was thinking it's
18:08
going to be quite Garis I'm not used to
18:10
that but I actually really enjoyed it so
18:12
hopefully there's things in this video
18:14
that You' made use of um or things you
18:16
might think about differently the next
18:18
time you do a kill team or whatever but
18:20
you know don't let anything stop you do
18:22
what you want have fun doing it and
18:24
that's the key and as always thank you
18:25
for watching don't forget to hit a like
18:27
And subscribe massive thank you to our
18:29
patrons cuzz they are awesome human
18:30
beings really appreciate the support um
18:33
just to do mad stuff like this um so
18:35
thank you very much and of course thank
18:36
you to gaale force 9 for sponsoring this
18:38
video as well it's been a lot of fun
18:40
been a bit of a blast and yeah can't
18:42
wait to use these guys in game
#TV & Video
#Hobbies & Leisure