Up next in 10


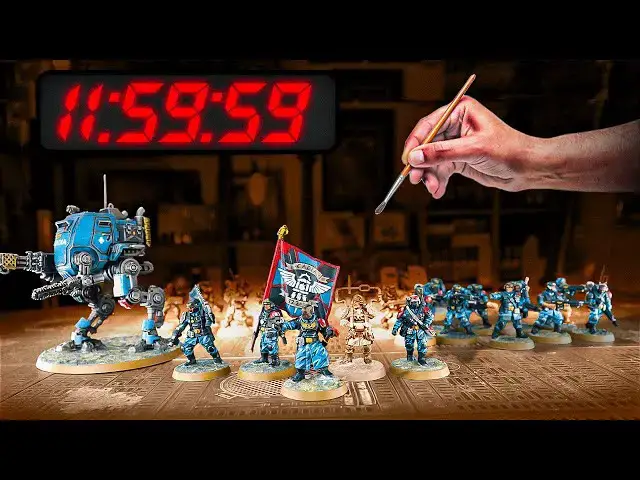
With the release of the new Cadian models for Warhammer 40K we got wondering, could Peachy Build & Paint the Cadia Stands box in 12 hours? Our Patrons chose the colour scheme of the 122nd Reg and he set off on the mission! Can it be done?
Join our Patreon: https://patreon.com/thepaintingphase
Help Support the channel with our affiliate links:
UK: https://elementgames.co.uk/?d=10835
EUROPE: https://taschengelddieb.de/?affiliate=tpp
US: use code paintingphase to get 10% off at https://www.goblinshut.com/
We Print Miniatures: https://weprintminiatures.com/thepaintingphase
THEPAINTINGPHASE for 10% off
Follow us:
https://www.instagram.com/thepaintingphase/
https://www.instagram.com/__peachy_tips__/
https://www.instagram.com/geoffsavory/
https://www.instagram.com/pileofshamepaints/
Where we get our music:
https://artlist.io/Patrick-75781
Show More Show Less View Video Transcript
0:00
so you're starting a new Army might be a
0:02
first it might be a second but like all
0:04
of us you're gonna move from zero to a
0:07
huge amount of plastic in no time we set
0:09
ourselves a Target can you paint a
0:12
Warhammer 40 000 Army in 12 hours
0:15
let's find out
0:17
for our new Army we're using the
0:18
contents of the cadius dung box set and
0:21
we're painting them in the classic City
0:22
fight color scheme of the Acadian 122nd
0:26
regiment as voted by our wonderful
0:28
Patron supporters we have our army box
0:30
set it's time to crack it open and get
0:33
build in
0:44
so I flipped through the instruction
0:46
manual and I'm picking the sergeant nice
0:48
and straightforward mini to demonstrate
0:49
on
0:50
it's just a matter of following those
0:51
build steps and working your way through
0:53
again when we're clipping our air I'm
0:55
going to use the flat side of the
0:56
Clippers when slipping out be mindful
0:58
when cutting that last part because
0:59
sometimes that would tendency to fly off
1:01
fill up the parts of a knife or a mold
1:03
line remover once you cut them off
1:05
personally I prefer to get everything
1:06
cut out in one go place them on the
1:08
manual and then just clean them up and
1:10
then just build them as the instructions
1:11
say it just helps speed the process up
1:13
now I built a few models in
1:15
sub-assemblies this is the gun crew who
1:16
are put on separate bases so I can paint
1:18
them easier and not have to work around
1:20
a big cannon again I'm making sure I use
1:22
super glue for this stage because it'll
1:23
be easier to snap them off later
1:25
[Music]
1:32
so everyone in our belt it's now time to
1:34
undercoat and then paint them now as I'm
1:36
painting these of an urban camo scheme
1:37
I'm going to be using Army painter wolf
1:39
gray which pretty much matches up with
1:41
rust gray if you're interested now I
1:44
always focus on the majority of color
1:45
schemes over these mainly fatigues and
1:47
trousers and stuff which is why I'm
1:48
getting gray but there's some things
1:49
that might vary in the Army so with a
1:51
sentinel and the actual Ordnance big
1:53
guns and I'll be spraying those silver
1:55
so we Brave the UK cold of -3 and the
2:00
Wolf Gray spray failed on his ads say it
2:03
drizzled spurted didn't really spray so
2:06
we had to quickly make some changes and
2:07
start to run inside grab some Chaos
2:09
Black undercoat on my trips to cow's
2:11
black and then get some lead Belcher on
2:13
the Sentinel on those weapons
2:17
so yeah uh we're undercoated black I'm
2:21
trying something here as opposed to
2:22
airbrushing or having the wolf gray
2:24
underket which didn't work as we've
2:26
already discussed on level cracker just
2:28
seeing if I can just over brush with
2:29
some wolf gray I hope these guys I know
2:31
it's got a bit of green on this brush
2:33
but that's fine because it's just
2:34
Stained It's All I Do let's just get
2:36
myself a dry brush
2:37
and just over brush that cloth
2:40
and see on that books I just need a
2:42
couple of coats
2:44
I originally would have done was just
2:46
sprayed it with gray would have been
2:48
super easy
2:50
not to the
2:52
because our gray spray failed I'm gonna
2:54
need to block out that gray the
2:55
old-fashioned way with a brush very big
2:57
brush and a couple of coats at that it's
2:59
unfortunate for the timing but the end
3:01
results will be the same
3:02
I'm not going for neatness here it's
3:04
messy but it's quick now that that's
3:06
done I'm an hour behind schedule it's
3:08
time to move on to the rest of the
3:10
miniature
3:12
our first step is to pick out all the
3:14
black sections using black Legion this
3:16
will be the armor the weapons and the
3:17
lever details like the boots and gloves
3:19
you could paint your leather brown but
3:21
as we go for Speed we're going with
3:22
black but we'll show you a cool trick to
3:24
differentiate the two materials later on
3:28
[Music]
3:32
so it took me 45 minutes to over brush
3:35
all that gray
3:36
so I'm 45 minutes behind I'm now
3:38
blacking out which is going to take
3:39
about an hour so
3:41
there we go
3:43
so we opted to paint the gloves all the
3:45
hands black so just a lot of leather
3:46
gloves to cut down on time because
3:48
that's what we're going for a speed and
3:50
then this absolute chance it turned up
3:51
with his sleeves rolled up we called him
3:53
Stephen
3:54
or should we say sneevan and it wasn't
3:57
one wasn't two
3:59
found out there's four of them four
4:02
that's gonna knock us back whole point
4:04
of it was just you know speed but no no
4:06
Slevin turns up in his mates and now
4:08
we're behind didn't get the Mellow did
4:10
they
4:12
how old is that next it was to pick out
4:15
his silver details using iron hand steel
4:17
most of this is gonna be weapons like
4:18
the last gun or things like grenades Etc
4:21
I nearly felt like an entire lifetime
4:23
painting the silver on this absolute
4:26
Muppet I mean literally every other
4:28
model in the set has options every
4:31
single one of them does except this guy
4:32
no yes of all the Aerials in the world
4:35
why
4:36
why so much that's why I hate him I hate
4:40
him so which I flicked him hard across
4:42
the table hey him and go away Master Vox
4:48
don't get me started that guy triggered
4:50
me all the way through this video
4:54
Pat we're trying to save time this guy
4:57
turns it with all the gear
5:02
next up is to pick out any gold details
5:05
using retributed armor this is mainly
5:07
Imperial scattered across the minis as
5:08
well as some belt buckles and a little
5:10
bit of trim on those sergeants and
5:12
officers shoulder pads
5:15
our next color is to use mephistan red
5:18
and this is for the left shoulder pole
5:20
again tying it in with that lovely city
5:22
fight art however for different squads
5:24
or platoons you can always use a
5:26
different colors and tie it up to you
5:28
so at this point we're blocked in a
5:30
whole bunch of colors next up is to pick
5:32
out that camo scheme for our 120 second
5:35
now I could just not do it and highlight
5:37
the models but it really just adds a
5:39
nice level of interest and it looks cool
5:41
and it actually looks like he's spent
5:42
more time on your models if you actually
5:43
have so the tech is an hour but it's
5:46
worth it for that impact
5:48
the first part of the camera pattern is
5:49
to use black Legion for the design and
5:51
we're looking at painting the letter Y
5:53
horizontally or slightly horizontally
5:55
now if you're not feeling that confident
5:56
then irregular Bobs will also do the
5:58
trick and should you make any mistakes
6:00
use the Army painter wolf gray to just
6:02
you know fix any mishaps take your time
6:04
and as I found when I was doing it I
6:06
actually got quite a good rhythm going
6:08
[Music]
6:17
for the second part of the camo we'll be
6:19
using pro acryl's bolt titanium white
6:21
again we are painting The Letter White
6:24
horizontally and again if you make any
6:25
mistakes use wolf gray or rust gray
6:27
whichever you've got
6:29
[Music]
6:35
well the camera now done what we're now
6:38
going to do is drench down a tie model
6:39
in normal oil because I know a few of
6:42
you out there really like it
6:44
around it which around those models in
6:46
Normal
6:48
as always with Shades be mindful of it
6:50
heavily pull in those recesses I did
6:51
need Pat to remind me a few times that's
6:54
fine if it does dry for brush and then
6:56
use it to soak up any excess Honestly
6:58
though after it dried and there was some
7:00
pulling it wasn't that massively
7:01
noticeable because well the camera
7:02
pattern kind of hit it applied the wash
7:05
yesterday and left overnight to dry
7:06
we've got about two hours 20 minutes
7:10
left
7:10
so the skin to do I've still got all the
7:13
weapons on the stem cell to do as well
7:15
it's fine we can do this most of the
7:19
models are built it's just like a bit of
7:21
skin I'm not stressed
7:23
you're built real stressed
7:27
it'd be fine
7:30
now we're going to add some distinction
7:31
between the armor and the leather
7:33
details and for this we're going to chip
7:34
the armor up using iron hand steel and
7:36
if you find any of your chips are too
7:38
big or clunky looking just get some
7:39
black agent and then just tidy back up
7:41
with it
7:47
[Music]
7:50
it's now time to pick out the skin tones
7:52
again any flesh tone would do but I'm
7:54
going to mix it up a little bit with
7:56
three tones across the Army set rack off
7:58
flesh for the lighter skin tone blood
7:59
Reaver for the mid-tone and then catch
8:01
on flesh for any darker tones I'll also
8:03
pick out any of the details like rack
8:05
off Flesh on the medic and parchment on
8:07
the banner and of course we mustn't
8:08
forget our full Guardsmen didn't get the
8:11
memo about rolling the sleeve down
8:13
sleeve and Strikes Again
8:21
to do is come over the rack off Flesh
8:22
and Blood Reaper flesh tones with golden
8:24
flesh and then I'll use normal oil for
8:26
the darker skin tone and at this point
8:28
you can also drench that over those bits
8:30
we did such as the banner and the medic
8:32
oh and of course don't forget the paper
8:34
on the blooming Master vox's
8:37
unnecessarily large xerox machine to
8:39
carry around now to speed up the
8:41
proceedings I'm going to apply my first
8:42
base and texture onto my infantry before
8:44
moving on to painting the audience and
8:45
sentos again was just to speed up I'm
8:47
going for a war-torn city Rubble Vibe
8:49
and for that I'm going to use a Dusty
8:51
gray base after this I'm going to be
8:52
using ak's lunar desert and I'm going to
8:55
apply quite heavily to the base not only
8:57
is it great texture paint but it's also
9:00
great value for money we worked out that
9:02
it costs about 6p per mil as opposed to
9:06
Astro Granite which is about 11p per ml
9:08
which is Matt uh it's a huge tub it goes
9:11
miles and I don't think we've even used
9:13
a quarter of it I'll also thin some down
9:15
when I'm splodging it around near the
9:17
feed again it just speed up the process
9:18
they can add some thicker after now
9:20
Astro is a decent alternative to this
9:22
especially if you've already got it but
9:24
honestly after using ak's basic
9:27
materials we recommend that it just
9:28
there's so much of it it goes for and
9:30
it's great and it just
9:34
looks better to us we're just having a
9:35
Christmas biscuit to console myself
9:36
because
9:38
we've hit the 12 hour mark
9:40
I've got all the troops done
9:42
paste what kind of they're waiting to
9:44
dry not done not not done that since no
9:46
one
9:48
these guys need doing
9:50
from those guys need clearing up but
9:52
nearly there nearly that I reckon
9:54
another two hours
9:55
14 hours 15 hours lifetime with golfment
10:00
Honestly though I mean with the time and
10:02
some of the issues we had sort of the
10:04
spray we've done okay could have been
10:06
worse
10:07
can they pat
10:09
could be Ray could have been pregnant
10:11
yeah
10:15
so now I'm gonna move on to our war
10:17
machines or weaponry and our Sentinel
10:20
now the central dried a bit weird after
10:22
we sprayed it because it had gone I
10:23
don't put some sort of outside or what
10:24
but you know what it's fine because
10:26
we're going to cut the whole lot in noon
10:27
oil really gentleman lawn oil and then
10:29
when they're dried I'm then going to do
10:31
a little bit of dry brush in a fine hand
10:33
steel so once that known all is dry get
10:36
some Iron and Steel wipe it off much as
10:38
you can and then just gently thick over
10:39
those edges giving it a nice subtle
10:42
highlight what I'm going to do here is
10:43
I'm going to paint all the armor panels
10:45
on these vehicles and weapons using wolf
10:47
gray which is the pot of paint not the
10:49
spray so I've got the pot paint ready
10:50
I'm gonna do a couple of coats here what
10:52
you're not gonna do which is all about
10:54
speed here if don't go to the edges does
10:56
two things saves your highlighting
10:58
secondly looked War torn weathered
11:00
battered been out obviously doing its
11:04
stuff on the battlefield for ages and
11:06
this is Imperial Guard fine great you
11:09
can use it for Orcs you can use it for
11:10
anything you can use the Space Marines
11:11
it just gives it a really nice weathered
11:13
battered effect and it's great and speed
11:15
Beauty and I've used it a lot for senior
11:18
as well it's worth taking up on scenery
11:21
after picking those older panels we're
11:22
now going to get some black Legion and
11:23
then just pick out the gun casing and of
11:25
course the wheels on those Ordnance
11:27
weaponry
11:31
there's a case of picking up little
11:33
Minor Details here so retribute to armor
11:35
for any Eagles
11:37
[Music]
11:39
and then mephistan red for any red
11:41
markings so just on the knee there of
11:43
the Sentinel also when using my fist in
11:46
red for the little monitor or table they
11:48
got I'm just going to use that thin down
11:49
pick out that screen also any lenses at
11:52
the front and then for any buttons I'm
11:53
just gonna use it straight from the pot
11:55
and again all those details we picked
11:57
out we're just going to drench those
11:57
with noon oil so again that's their wolf
11:59
gray black Legion retrometer armor and
12:01
the mephistan red
12:03
right
12:04
Vehicles Weaponry done what we're now
12:07
going to do is clip off those models
12:09
from the bases because they were there
12:10
just so we can hold them and paint them
12:12
again because they're super glued quite
12:14
easy to snap off there might be one or
12:15
two where you need to use Clippers and
12:16
dig into a little bit for the most part
12:18
they're just going to pop off and then
12:20
just clean them underneath with a Nica
12:21
to that bits of canoe on the bottoms or
12:23
on the feet
12:25
and then once they're all glued onto the
12:27
wall machines or the Ordnance weapons
12:28
we're then going to start basing them in
12:30
that texture and leave that to dry and
12:31
then move on to applying some liquid
12:33
pigment
12:36
so we are 13 and a half hours in now so
12:39
that's an hour and a half over where I
12:41
want it to be but that's fine evidence
12:42
base is waiting for some of the bigger
12:44
things to dry off and then I'm going to
12:45
add some liquid piglets to those but I
12:47
thought you know what probably an extra
12:49
hour's worth of work after that I'm just
12:50
gonna tart up a few things tighten the
12:53
flesh up put some transfers on put some
12:55
words on the ballot you bet that I'll be
12:58
happy with that said yeah
13:00
yeah
13:02
he's killed it
13:04
you're looking at the Double cabinet
13:07
Christmas
13:10
these are like enamel based so you'll
13:13
need thinners to thin then we've got
13:14
some thinners here apparently it's got a
13:16
nice fruity fragrance smell interesting
13:18
and all they do is apply that over the
13:21
texture and then if I need to in some
13:22
place where it's a bit too thick and
13:24
goopy or too much I'll just use the
13:25
thinners just to thin it down
13:27
once applied it will dry matte and is
13:30
self-fixing so you won't need to seal it
13:32
or anything alternatively you can
13:33
exercise Andrew dust or steel Legion
13:35
giraffe and really thin it down and
13:36
apply that over the Astro Granite if you
13:38
don't want to use this
13:39
to finish off I'm going to use steel
13:41
Legion jump as I always do to paint the
13:43
rim honestly you can use any color I
13:45
just love this and I think it's a nice
13:47
visual bridge between the bass and the
13:48
gaming board
13:49
[Music]
13:55
so all our models are based they're done
13:58
with 14 hours in however being me and
14:03
finicky want to add some extra details
14:05
and I'm going to give myself an extra
14:07
hour and the reason for doing that is we
14:10
all know a life expectancy of a
14:12
Guardsman is 15 hours so hopefully
14:15
they'll have at least a minute to fight
14:17
before I finish penis
14:19
we'll find out
14:21
I keep doing myself deadlines and
14:22
missing them
14:28
now I'm going to highlight the skin
14:30
using the base coats we applied such as
14:32
rack off left of the pale tones blood
14:33
River flesh from the mid-tones and catch
14:35
and flesh for the darker tones you can
14:37
always mix in other colors if you want
14:38
them lighter but I just want to add a
14:39
bit more punch to that skin
14:42
and for the rakoff flesh one of the well
14:43
I just added a little bit more thin gun
14:45
will flesh after because some of those
14:47
highlights can be quite Stark Skin's
14:49
done you can leave it there but I really
14:50
want some numbers on those shoulder pads
14:52
so we're just going to add some
14:53
transfers to our models now I'm going to
14:54
do it really quick we're using some hard
14:55
coat and some varnish and a knife not
14:58
too mad so let's see how we get them so
15:00
first of all I'm going to prep that area
15:01
where I want my transfer to go and for
15:03
this I'm using hard coat or any gloss
15:04
will do it's unlike things up the
15:06
Sentinel you want to do the whole panel
15:07
as well because it can look different
15:08
with toe and if you just pick out little
15:11
areas so do the whole section once it
15:13
becomes very noticeable then it's about
15:15
cutting out that decal so depending
15:17
which ones you want just cut to the
15:19
shape apply that decal to a piece of
15:21
damp tissue knee for around about 30
15:23
seconds lift off and then apply to the
15:26
desired area you should use tweezers I'm
15:27
just using my brush here to pick it off
15:29
once they're on just dab it with a bit
15:30
of tissue and then all we're going to do
15:32
is get some matte varnish and apply that
15:34
over again any amount of varnish we do
15:36
I'm just using matte varnish plus here
15:38
you could use thin down PVA or whatever
15:41
it's going to talk to you it will dry
15:43
matte and it just helps seal it in as
15:45
well
15:46
and I certainly look Mega
15:49
[Music]
15:57
there we are the only is done our aim
16:00
was to paint our army in 12 hours a 40K
16:04
Army in 12 hours can it be done no I
16:07
said 15. can I return no because I went
16:10
over by 15 minutes 15 minutes over 15
16:13
hours so 15 hours 15 minutes life
16:15
expectancy I was basically adding decals
16:17
to corpses is what I was doing there now
16:20
I would say it's really really handy to
16:22
give yourself deadlines yes I was
16:24
probably a bit ambitious with the 12.
16:25
took me about 15 just over 15. that's
16:28
fine if other said to myself can I paint
16:30
this box set in 24 hours I probably
16:32
wouldn't pick weird details I would have
16:34
took the foot off the gas
16:36
I might even end up with the same level
16:38
of content because I didn't stretch
16:41
myself I didn't push myself but actually
16:43
it took me 15 hours not 18 or 24. so it
16:47
is worth giving yourself stringent
16:48
deadlines or really challenging
16:49
deadlines be surprising we can do in
16:52
that time well after that roller coaster
16:55
I hope you found watching this video is
16:57
giving you some insights of army paint
16:59
and also things you can learn from it
17:00
things you tried maybe you've not even
17:02
thought about before so thank you very
17:04
much for watching I hope you found some
17:05
useful stuff in it also a big thank you
17:07
to our patrons as well for all the
17:09
support and also if you're watching this
17:10
for the first time why not join us on
17:12
patreon loads of benefits and it helps
17:14
support us as well don't forget to check
17:15
out those affiliate links again another
17:17
way of supporting the channel until the
17:19
next time
17:21
stay Sharp