0:00
hey everyone this is the first in what I
0:02
hope becomes a long series of quick
0:03
helpful videos so I'll say it right up
0:05
front if you want more of these slam the
0:07
like button share the video boot it into
0:09
the algorithm's face and drop a comment
0:12
telling me what printing tips or myths
0:14
you want me to tackle next right let's
0:16
go hi I'm Ross this is Fammer Videos and
0:20
today we're talking about how to get
0:21
perfect exposure when resin printing and
0:24
why that's probably the worst thing you
0:26
could aim for if you've seen any of my
0:28
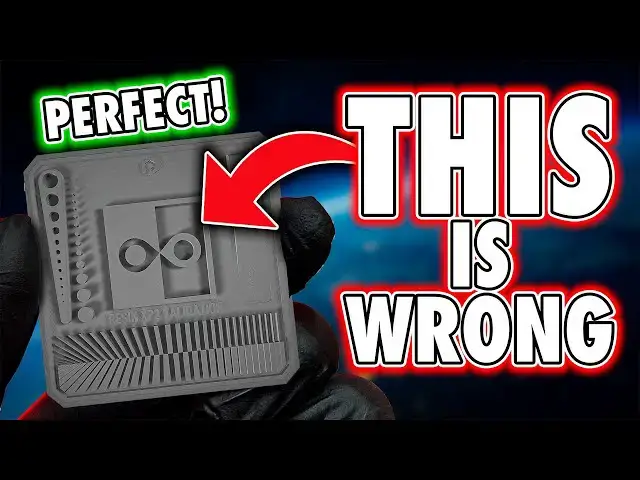
review videos you'll have seen this flat
0:30
exposure test i use it in every review
0:32
for three reasons one is because it's
0:34
the one I started with two it's got a
0:36
measurable result you can count
0:39
literally and three because I use it
0:41
every time it gives us results
0:43
comparable across all of my resin
0:45
printer reviews and when we see this a
0:47
lot of people understandably focus on
0:50
the center of the test where the little
0:51
logo lines up because someone once said
0:54
to do that when it first came out out
0:56
and years later I still see that advice
0:58
going around and it seems logical it
1:00
does if the lines are sharp you're good
1:02
if they're mushy you're not but that
1:04
method it's subjective what actually
1:07
works and what you don't need to
1:09
question anybody about when you see it
1:11
and what I always recommend is checking
1:14
the holds and posts on the left side of
1:16
this test more posts than holes
1:18
overexposed more holes than posts
1:20
underexposed equal number of each
1:22
balanced perfect yeah it's not a guess
1:25
it's not subjective it's countable
1:27
measurable and that's why I love it
1:29
everything else on this test logos
1:31
resolution bars a ramp it's just detail
1:34
sampling it shows you what your printer
1:36
can do but not what it can survive doing
1:39
that's the catch perfect XY exposure
1:42
doesn't always equal reliable results
1:44
accuracy isn't strength it won't tell
1:47
you if your cured layers will survive
1:49
being peeled off the release film or if
1:51
your delicate little sword blade is
1:53
going to give up halfway through a print
1:55
some resins stretch and bend some snap
1:58
some do both if you take your perfect
2:00
exposure and print a pre-supported model
2:02
odds are something's going to break and
2:04
let's be honest most of us are printing
2:06
pre-supported models now whether they're
2:08
well supported or not is another matter
2:11
so then we have to ask a question and
2:12
this is to ourselves what do we actually
2:15
want successful prints which means most
2:17
of the time probably nudging the
2:19
exposure up slightly yes we'll lose a
2:22
bit of detail but we'll also lose the
2:24
frustration of mid-print failures now
2:26
before I move on and because this is the
2:28
first one I'm doing in this format I
2:30
need to give a quick shout out to this
2:32
video's sponsor it's sponsored by Eligu
2:34
they paid for the time to make it but
2:36
they don't get to approve the content or
2:39
my opinion that's all me we've agreed to
2:41
do two videos to start and if they help
2:43
enough people we'll probably do more so
2:46
again like I said in the intro if you
2:47
like this like it share subscribe all
2:50
that jazz right back in so you're
2:52
probably wondering why even bother using
2:54
that flat exposure test at all well for
2:57
me it's now something I started with and
2:59
again makes printers comparable across
3:01
all of my videos but the main reason
3:04
speed this prints in about 12 minutes at
3:06
30 micron layers and it uses only 1.6 6
3:09
ml of resin the cones of calibration for
3:12
example uses 2.7 ml of resin and can
3:15
take roughly five times longer so I use
3:17
that flat XP test to do nothing more
3:20
than get me in the exposure ranges
3:21
ballpark but if you've got a printer
3:23
like the Saturn 4 Ultra or Mars 5 Ultra
3:26
or you can run an RF test on other
3:28
brands yeah you can run multiple
3:30
exposures on one plate so maybe skip the
3:33
flat test and just jump straight to what
3:35
we're going to cover next which honestly
3:37
is one of two options you could just
3:39
print pre-supported models and if they
3:41
fail bump up the exposure and try again
3:43
for a faster way of getting to it
3:45
because this is now shorter than a mini
3:47
yeah print the cones of calibration and
3:49
again increase or decrease the exposure
3:51
and try again now whilst the cones does
3:54
have parts on it which measure XY
3:56
accuracy really well what we want to
3:58
actually aim for here is support
4:00
strength you want the success cones to
4:03
hold and the fail cones to fail that's
4:06
the Goldilock zone and yes we probably
4:08
do have to overexpose a bit beyond the
4:11
perfect exposure balance but if you're
4:13
going to run this I highly recommend you
4:15
having a full read of Table Flip
4:17
Foundry's website as to what you need to
4:18
do but the key thing to follow I would
4:21
say is the flowchart on that web page
4:23
follow it but it also proves that
4:26
perfection isn't the goal only one route
4:29
to the goal has perfect the others are
4:32
about acceptable results and that's just
4:34
fine not every resin and printer combo
4:38
is going to print perfect what we want
4:40
them to print are the most accurate
4:42
models possible successfully and I would
4:45
argue that success is a bigger goal than
4:47
100% accurate especially when 99%
4:50
accuracy is often achievable but again
4:52
just be aware the cones of calibration
4:54
aren't gospel they're also a guide
4:57
pre-supported doesn't equal wellup
4:59
supported if you want fewer surprises
5:01
use models from reputable sources in
5:03
regard to supports i regularly rate the
5:06
ones listed on Atlas 3D's creative
5:08
partners page because Atlas 3D kind of
5:11
set the gold standard amongst supporting
5:14
miniatures and one last thing even if
5:16
your exposure spoton you can find that
5:19
prints still fail depending where they
5:21
are on the plate and that's thanks to
5:22
uneven UV spread especially on newer
5:25
machines with COB light sources but
5:27
that's going to be content for another
5:29
quick video and if you want that again
5:31
I'm going to encourage the liking
5:32
subscribing and sharing thing overall
5:34
the big picture exposure test fast
5:37
instant detail check cones takes a bit
5:40
longer reliable strength check and also
5:42
covers XY accuracy as more of a
5:45
secondary thing if your goal is the
5:47
sharpest detail use the XP rangefinder
5:49
and count the number of posts and holes
5:52
that is a measurable way to find out
5:53
what the results are but this may leave
5:55
you supporting your own models entirely
5:58
if you want your models to print
5:59
reliably maybe use that test and bump up
6:02
the exposure slightly or trust the cones
6:05
but the whole point of this video was I
6:07
hope it encourages some people to stop
6:08
chasing perfection which is a comment I
6:10
see on most of my videos most of the
6:13
time what's the most accurate printer
6:15
instead start chasing results perfect
6:18
exposure isn't always the best i want to
6:20
say thanks again to Eligu for sponsoring
6:22
this video and thank you for watching a
6:24
huge shout out goes to our channel
6:25
members whose names are on screen now
6:27
and if you've got a tip that you want
6:29
covered drop it in the comments until
6:31
next time smoke me a kipper i'll be back
6:34
for breakfast faux hammer out