Up next in 10


Go and Check out Puppetswar and their awesome miniatures:
https://puppetswar.eu/
https://www.patreon.com/puppetswarminiatures
Are you struggling to paint yellow or wondering where to start with what has been branded as a difficult colour to paint? Peachy takes you through a load of methods, compares and contrasts them, so you can be on the road to painting a yellow army in no time! #sponsored
Check out goobs, ebay rescue, and Richard Gray's videos here:
https://youtu.be/mmnPkiiswPk
https://youtu.be/40Tgpy08dTc
https://youtu.be/TUd5GFXWGsI
Join our Patreon: https://patreon.com/thepaintingphase
Help Support the channel with our affiliate links:
UK: https://elementgames.co.uk/?d=10835
EUROPE: https://taschengelddieb.de/?affiliate=tpp
US: use code paintingphase to get 10% off at https://www.goblinshut.com/
We Print Miniatures: https://weprintminiatures.com/thepaintingphase
THEPAINTINGPHASE for 10% off
Show More Show Less View Video Transcript
0:00
thanks to public War for sponsoring this
0:01
video now over the years I've heard that
0:03
yellow is one of the worst or hardest
0:04
colors to paint yielding different and
0:07
varied results whether that be too beige
0:08
too dull too green or even even two
0:12
yellow so myself and Pat have been
0:15
trawling across the internet to find a
0:17
variety of different ways of painting
0:19
yellow and we've yielded some
0:21
interesting results you may at the end
0:22
of this video have a new Femme favorite
0:24
I certainly do now the model we're going
0:27
to be using this video are going to be
0:28
the bushy frying Gunners that are from
0:31
puppets Wars if you want to check them
0:32
out and see how to get all them there's
0:34
a link in the description that will take
0:35
you straight there as well so our first
0:37
way of painting yellow is probably going
0:39
to be the most simplest and
0:40
straightforward way of painting yeah I
0:41
wish is to get a rattle can and spray
0:43
the model yalex simple if the majority
0:47
of your model is going to be yellow
0:48
honestly I think it's the best time
0:49
point it's super quick most of the time
0:51
there is a relevant bass clip to coming
0:53
in the primer but do be mindful when
0:55
spraying I'd recommending a couple of
0:57
short burst coats instead of trying to
0:58
do a full coat in one spray and it will
1:00
just clog up the detail so there we are
1:02
that was super quick and easy very
1:04
straightforward now there are other
1:05
yellow sprays out there available AK
1:06
have some as well as Army painter as
1:09
well we just chose this one because it
1:10
matches perfectly to Avalon Sunset now
1:12
we have decided across this video to put
1:15
a ranking system for all the yellows
1:17
honestly it varies on the model you're
1:19
painting the tone of color you want and
1:21
the details that they have on it but
1:22
we're doing a ranking system anyway and
1:24
it's called the yellow omitter and this
1:26
particular method we're ranking 4.8
1:29
bananas out of five on the Elementor now
1:33
if you don't have an undercoat spray and
1:34
you only have like black at home there
1:37
is another way of doing this and this is
1:39
by hand now we've probably all done this
1:41
at some point in our life I used to do
1:42
it a lot as a young lad I used to think
1:44
the brightest yellow possible over black
1:46
would look great it didn't it looked
1:48
green and well learned from my mistakes
1:50
so what I'd say here is find a decent
1:53
base coat such as Amazon set a couple of
1:55
thin coats so in this instant I'll
1:57
recommend a few thin coats of Avalon
1:58
Sunset honestly I'm so used to using
2:01
this paint I have zero fears on base
2:02
coating over black or dark tones it's
2:04
it's easy and cost effective but very
2:06
time consuming and opens to a lot of
2:08
areas such as thick coverage so do take
2:10
your time
2:11
but it's great if you have no primers or
2:13
airbrushes
2:16
[Music]
2:21
as you can see it looks okay it did take
2:24
a lot longer than spraying it just
2:25
yellow but the results are fine again
2:27
just be mindful how many coats you do
2:29
and as you can see side by side the
2:31
results look very similar just doing it
2:33
by hand it takes a lot longer
2:34
um and obviously you just be mindful of
2:36
those thin coats now bearing all that in
2:38
mind on the award system for the
2:39
Elementor I'm going to award this seven
2:42
and for 12 lemons if you're looking for
2:45
a more Grim dark approach and this one
2:47
we're going to show you has almost like
2:48
built-in shading as well and this is dry
2:50
brush in avaland Sunset over a black
2:52
undercoat now it's ideally suited for
2:55
things like smaller sections and heavy
2:57
texture stuff such as gun casing helmets
2:59
maybe like I don't know fur and stuff
3:01
but the models we're using this video
3:03
have a lot of texture so I think it'll
3:05
work quite well with those as well so
3:06
what we're going to do here is just
3:07
heavily dry brush over that texture I'm
3:10
not removing as much as I normally would
3:12
when I'm dry brushing as you can see
3:13
these models lend themselves to this
3:14
method really well whereas maybe a
3:16
primaris marine because it's got more
3:17
smooth rounded armor it probably won't
3:19
be as effective like I said it's very
3:21
rudimentary but very quick and has
3:22
built-in shading as you can see here
3:24
that's the completed version so it's got
3:26
some nice shade in there and a decent
3:28
coverage of Base coats as well I'd
3:30
probably say this is more suited to
3:31
structures like buildings as well as
3:33
vehicles but depends what you're trying
3:36
to achieve really that being said I'm
3:38
going to award this 10 egg yolks out of
3:41
a Baker's Dozen just before we go into
3:43
the contrast paints I'm just gonna have
3:44
a quick word about our sponsor puppets
3:46
wall you might have heard of Puppets War
3:48
already and if you haven't you should
3:49
with war crate 3D models you can
3:52
download and print yourself or buy resin
3:53
minis individually if you don't have a
3:56
printer you can use these minis in their
3:58
own tabletop gaming system or proxy them
4:00
into your own armors for other games
4:01
probably as well as a patreon releasing
4:03
new Miniatures every month if you
4:05
subscribe you get access to a discounted
4:07
back catalog too in their General
4:09
release you can find awesome heavy
4:10
gunners menacing Orcs And vehicles and
4:12
some awesome Warrior bugs some of the
4:15
best bits about the design of these
4:16
Miniatures is they're built for magnets
4:17
want to change your standard backpack
4:20
for a sashimoto puppets War has got you
4:22
covered want to change your sashimono
4:24
for a rotor pack puppy's War has got you
4:27
covered a simple set of Marines can now
4:29
serve a multitude of purposes we also
4:32
had a load of different gun options too
4:33
so you can continue to customize your
4:35
minis now you can find all the links for
4:37
puppets War down in the description or
4:39
would also like to thank Providence War
4:40
for sponsoring this video right
4:43
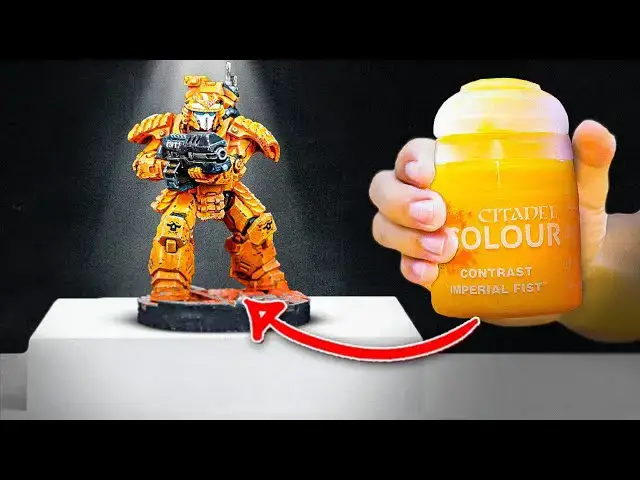
contrast paint now another option if the
4:46
majority color of your model is going to
4:47
be yellow is to use a contrast paint now
4:49
this is ideally suited over a white
4:51
undercoat so if you don't have a yellow
4:52
spray get some white and then apply this
4:55
contrast now this contrast is one of the
4:58
newer ones which is Imperial Fest and I
5:00
would State this is the best contrast
5:02
yellow out there
5:04
it's true it's amazing the great thing
5:07
here is if you start bright you only
5:09
need to use shade and contrast to add
5:10
depth and maybe a little highlight here
5:12
and there at the end personally I prefer
5:14
this method as it's quick and looks
5:16
amazing with very little effort and
5:18
that's before any Shades or highlights
5:19
are applied
5:24
now this method was really quick and as
5:26
you can see next to like the other land
5:27
Sun sort of that's a sprayer over black
5:29
it makes it look ocher almost brown it's
5:32
so bright it's so vibrant so if you want
5:34
a real nice punch to Yellow this is
5:36
definitely the route to go for again
5:37
when you're applying contrast be mindful
5:39
because it can pull into the recesses
5:41
are just soak that up and I think on The
5:44
Eliminator we still award this five
5:47
out of six corn on the cobs so this next
5:49
example is using an airbrush we're using
5:51
the exact same colors so white undercoat
5:53
with a nice bit of Imperial fist being
5:56
blasted through the airbrush and you
5:59
don't need to thin that down it just
6:00
goes straight to the airbrush as is now
6:02
the downside to this is you will lose
6:03
the contrast effect when blasting it
6:05
through an airbrush so you won't get all
6:06
that extra depth in the recesses but
6:08
depending on how you want to approach
6:10
this that could potentially be a bonus
6:11
as well so this really just depends on
6:13
how you want your yellow to look so you
6:15
can see a side by side we have both the
6:17
one done by hand and the one done by the
6:19
airbrush now you do loosen that
6:21
definition like I said in the recesses
6:22
but this is just really nice and a
6:24
really good way of getting a bright
6:25
yellow that you can then add your own
6:27
Shades later on and we should award this
6:30
89 lemons out of a tree
6:33
so this next method I got from Brent
6:36
from Google Town hobbies and Casey from
6:38
eBay miniature rescue now they use
6:40
things like inks and airbrushes so we're
6:42
going to go for a very rudimentary
6:43
approach which is using rattle cans or
6:45
primers some dry brushing and in one
6:48
instance we use two primers a bit of
6:49
pink and a bit of white so a lot easier
6:51
a lot more accessible but it should
6:53
yield very similar results
6:55
we're going to show two versions from a
6:57
pink undercoat here we're using Army
6:58
painter pixie pink now for this example
7:00
we shall dust over with White Scar so
7:03
you want to do this a little bit from
7:04
the top so you still get some that pink
7:06
in the recesses at this point I know it
7:08
looks weird however what we're now going
7:09
to do is get some Imperial Fist and thin
7:11
that down 50 50 with water or contrast
7:13
medium whichever you have and what
7:16
that's going to do is turn those pinks
7:17
into a rich orange and those whites will
7:19
just be a nice clean crisp yellow
7:22
foreign
7:22
[Music]
7:27
white Over the Top If you don't have
7:29
access to an airbrush or spray paint it
7:31
will leave a rougher texture but a fill
7:33
up in smooth coats you shouldn't yield
7:35
similar results now Brent used yellow
7:37
ink from day and rally in this vid but
7:39
again I'm going to be using some
7:40
contrast which is Imperial Fist and on
7:42
this one I'm going to use it straight
7:43
for the pot
7:44
[Music]
7:59
so all in all that was pretty quick and
8:02
pretty effective and we were so
8:03
impressed by this method that we
8:05
actually didn't rate it and really it's
8:09
a stupid rating system that makes no
8:11
sense anyway so I don't care
8:13
I will eat another sweet
8:17
stress him out again I can't open it I
8:19
can't open why is the wrapper different
8:21
what's going on now our next method is
8:23
using the yellow layer paint over a
8:26
black undercoat now in my many years of
8:28
service in the studio I heard this is
8:30
the best way to paint yellows on models
8:32
and that is with an airbrush
8:34
over black undercoat I raised eyebrows
8:37
many times when I heard this and truly
8:39
didn't believe it but today we're going
8:40
to give it a
8:41
actually I'm lying I'm not going to give
8:43
it a go because I don't want to and
8:45
Pat's going to do it instead with an
8:47
airbrush
8:48
if that didn't want to do it because
8:50
it's stupid
8:52
[Laughter]
8:57
it's over a black undercoat good luck
8:58
Pat it's gonna take your hour
9:02
and it's so lime green on the first coat
9:04
and it's still a bit green on the second
9:07
foreign
9:10
and seven coats later we kind of got a
9:12
yellow although it still looks a tad
9:15
green now honestly looking at it it's
9:16
not awful I mean because of the amount
9:18
of layers that Pat's put on there and
9:20
this could be down too is an ability to
9:21
use an airbrush because he's new orange
9:23
because the type of yellow it is I don't
9:26
know but it has obscure of some of the
9:27
detail of that allowed we're gonna give
9:29
it five limes in the bin
9:35
for our next example we were inspired by
9:37
Richard Gray stippling method now a
9:39
quick disclaimer you may not notice but
9:40
I am not Richard Gray and for a better
9:43
example of this method go check his
9:45
video out firstly we're stepping on thin
9:47
down Moon Fang Brown three parts water
9:49
to one part paint
9:50
now you want to do a couple of cubes of
9:52
this so probably three coats will be
9:53
enough
9:55
then using the same mix ratio we should
9:58
do a similar effect with zamasi desert
9:59
again build up that texture and tone and
10:02
again you probably want to do this again
10:03
another two or three times
10:05
[Music]
10:07
now we're going to use aerial yellow
10:08
again I'm using the same mix here but
10:11
reflection I should have thinned this
10:12
down more but I've made my choice and
10:14
now we'll sliver it and what I mean by
10:15
that is the way Richard did it it was a
10:18
little bit less bright and very yellowy
10:21
at the moment there was a bit more
10:22
transition a little bit more Brown in
10:24
there so I've pretty much removed a lot
10:25
of that brown
10:30
now like with Richard's video here I'm
10:33
going to drench in the dark tone
10:34
contrast and for this we're going to be
10:35
using Darko flesh
10:40
and whilst it's wet and working very
10:42
quickly we're applying contrast medium
10:44
here this will assist in removing some
10:46
of that dark tone and basically then in
10:49
the overall effect I wasn't sure why
10:51
this was done on the model as I'd
10:52
personally thin it down before applying
10:54
it but on reflection I do like the
10:56
effect and I imagine Richard is
10:57
mimicking an oil application effect here
11:01
lastly I'm glazing some aerial yellow on
11:03
the raised parts for some more
11:04
definition
11:07
[Music]
11:16
so I actually quite like the effect of
11:18
this now from my experience a lot of
11:20
those initial steps felt like they were
11:22
lost a bit and they didn't really have
11:23
an end effect but I trust Richard Gray's
11:25
process because he knows what he's doing
11:27
and although it was quite long-winded I
11:30
still really like the end effect so that
11:32
being said I'm going to award this seven
11:34
Richards out of 10 Grays so as you can
11:37
see we've got a whole arrange of
11:39
different ways of painting yellow
11:40
silverlays have already kind of been
11:41
highlighted or shaded but what we're
11:43
going to do now is for some of us we're
11:45
going to show a different way of
11:46
applying some Shader that's recessed
11:47
Shades all over Shades and some
11:49
different ways of highlighting with
11:50
different tones so first up we're going
11:52
to concentrate on some shading now
11:53
there's two real decent methods of
11:55
shading there's all over and recess
11:57
shading they both have their pluses and
11:59
minuses so we're going to start first of
12:01
all with an all over shade from years of
12:03
painting it's become quiet apparent that
12:05
though an all-over shade feels quicker
12:07
at the start there is much more work in
12:08
getting that brightness and punch back
12:10
because you have to do a lot of layering
12:12
up now I'm going to be applying this all
12:14
over our Neverland Sunset base coated
12:15
miniature it's quite messy but it is
12:18
very quick and what I'm gonna have to do
12:19
is once that's dried is actually go back
12:22
get Avalon Sunset and tidy back those
12:24
raised areas and that will take ages now
12:26
another thing though is with the new
12:28
formulated Citadel Shades they're not as
12:30
bad and even better if you thin them
12:32
down so actually you could save yourself
12:35
a lot tidying up by using the new shades
12:37
so depending on which kind of shade you
12:39
have whether it's an old Citadel shade
12:40
or different companies worth of Shades
12:42
or the new formulated Citadel ones you
12:44
will yield different results like I said
12:46
for my experience it takes a little bit
12:47
longer doing the tied up stage at the
12:49
end and for that I'm going to award this
12:51
three tangerines uh one orange next up
12:53
is to do some recessed shading this will
12:55
seem like it takes longer at the start
12:57
but I think because it knee turns only a
12:59
little bit of tidying up it's actually
13:00
probably quicker than the first version
13:02
melee or even roughly recess shade and
13:05
may seem longer to begin with it's
13:06
actually the most efficient and quickest
13:08
method to get in depth in those recesses
13:10
I'm applying this over the airbrushed
13:12
Imperial fist Mini
13:14
and as you can see there's much less
13:15
time up to do
13:17
what I'm doing here though is that
13:18
they're tying up I do need to do I'm
13:20
just going to use aerial yellow as it's
13:22
a nice perfect match and I would say
13:24
that was a little bit quicker than
13:26
actually doing it the other way which is
13:27
the all-over shade and for that reason I
13:29
am going to award this one Yellow
13:31
Submarine out of Thunderbird 2. now that
13:33
we're focused on shading recess shading
13:35
all over regardless we're now going to
13:37
concentrate on highlighting now when it
13:38
comes to yellows there's a couple of
13:40
options to pick from do you pick a cream
13:42
or bone highlight do you go for a yellow
13:44
highlight or do you dry brush it or do
13:47
your Edge highlight it so we're going to
13:49
go through all those examples and I
13:52
guess you can decide which one works for
13:54
you now our first method of highlighting
13:56
is using yellow highlights so here we're
13:58
using Dawn yellow and first of all I'm
14:00
going to dry brush this on the back of
14:02
the model so you can see the effect of
14:03
dry brushing over those Rich yellows
14:06
we've got and Doria is quite a nice
14:08
yellow so it adds a bit of Pop to those
14:09
edges
14:12
now the other option if you don't want a
14:13
dry brush and you want to Edge highlight
14:15
is just get your brush to a nice point
14:17
and just run across those edges use the
14:19
edgy brush if you can some of those
14:21
edges but you will need to use a point
14:22
from time to time and again thin it down
14:24
a little bit as well
14:29
and here you can see both the effects of
14:31
edge highlighting versus dry brushing
14:32
and really pick whichever one suits you
14:35
so another reason for using bone as
14:37
opposed to Yellow is it gives it more of
14:38
a natural result as opposed to quite a
14:40
stark bright result so sometimes
14:42
depending on the tone of your yellow you
14:44
use will require maybe a yellow
14:46
highlight or a berry highlight again
14:48
that does reflect on the base color and
14:50
the shade as well so Imperial fists work
14:52
better I find with bone highlights
14:54
whereas maybe like bad moons probably
14:56
work better of a yellow highlight now
14:58
another thing we need to do now is show
15:00
you what it looks like if you use a
15:01
weird yellow highlight on something
15:03
that's a bit more dirty so what we're
15:04
going to do is get an Avalon Sunset base
15:06
coat of miniature the one that we dry
15:08
brushed over black and we're going to
15:09
use a really bright vibrant yellow as a
15:11
highlight and show the effect of that
15:13
now first up we're going to dry brush
15:14
this I'm going to do this on the back
15:15
like we did with the previous ones and
15:17
all in all it doesn't look that bad so
15:20
I'm actually quite pleased the end
15:21
result and this will work quite well
15:22
again for like structures or vehicles
15:24
and stuff however doing an edge
15:26
highlight as you can see here isn't as
15:28
good it looks a bit weird a little bit
15:30
jarring and I would probably describe
15:33
this as a pile of sick there we are we
15:35
have a whole load of different ways to
15:36
paint yellow
15:38
I have my new favorite which is using a
15:40
pink undercoat with white over the top I
15:42
was very dubious when I saw Brent and
15:44
Kate to do this but I trusted the system
15:46
trusted their ability and it's paid off
15:48
and I really like it I'll probably still
15:49
use other yellows from clanstone but hey
15:51
thank you for watching thank you to our
15:53
patrons thank you to puppet War again I
15:55
hope you've learned something from this
15:56
video check out the links in the
15:57
description we'll see you around bye
15:59
using the following screen is applying
16:01
this over a black undercoat good luck
16:04
Pat are you saying falling screen on
16:05
purpose Phalanx no no green you're
16:08
singing
16:11
Yellow idiot
16:15
wow
16:16
in my head
#Arts & Entertainment
#Hobbies & Leisure