Up next in 10


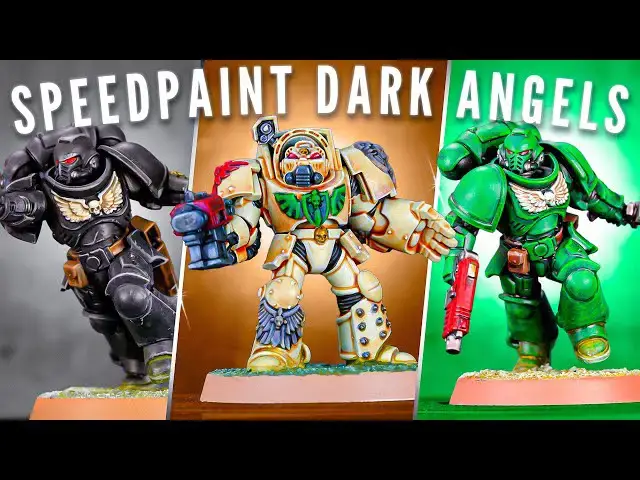
Peachy takes you through how to speed paint all of the Dark Angels armour types, Deathwing, Ravenwing, and the stand green armour worn by the Dark Angels. These schemes are designed to use a few paints as possible and allow you to get an army painted and on the tabletop in no time! #darkangel
Join our Patreon: https://patreon.com/thepaintingphase
Help Support the channel with our affiliate links:
UK: https://elementgames.co.uk/?d=10835
EUROPE: https://taschengelddieb.de/?affiliate=tpp
US: use code paintingphase to get 10% off at https://www.goblinshut.com/
We Print Miniatures: https://weprintminiatures.com/thepaintingphase
THEPAINTINGPHASE for 10% off
Follow us:
https://www.instagram.com/thepaintingphase/
https://www.instagram.com/__peachy_tips__/
https://www.instagram.com/geoffsavory/
https://www.instagram.com/pileofshamepaints/
Where we get our music:
https://artlist.io/Patrick-75781
Show More Show Less View Video Transcript
0:00
you're definitely sure we're recording
0:01
this time yes you sure yes you're
0:03
absolutely sure yes so everything I say
0:05
is going to be the viewers are going to
0:06
watch it they're going to hear it cool
0:07
Wicked so the Dark Angels are getting a
0:10
lot of love of the minute lots of new
0:12
kits coming out the line is rumored to
0:14
be coming out don't quote me that that's
0:16
fact because I never paid attention to
0:17
the release schedule so I have no clue
0:19
if he is or not however in this video
0:21
we're going to show you how to paint up
0:22
the three branches of the Dark Angels so
0:24
the Deathwing The Raven wing and of
0:25
course the standard green armor I'm
0:26
gonna show you how to do it fast so you
0:28
can get on the tabletop as quickly as
0:29
possible so you can play lots of games
0:31
and pew pew the Loyalists chaos who who
0:34
cares what they are they're chaos
0:35
because they're they look it their
0:37
baddies come on they shoot everyone they
0:39
kill everyone and they hunt down the
0:40
Fallen yeah sure whatever boss in this
0:43
video we're going to share to get some
0:44
extra steps in there as well so you can
0:46
add a little bit more love to your
0:47
models if you want to they are chaos
0:49
it's facts that's the one thing I did
0:51
know from working in my time at Games
0:53
Workshop is the Dark Angels are chaos
0:55
you heard it here folks first up is the
0:58
Deathwing my personal favorite I just
1:00
really like that white armor they're the
1:02
inner circle they know all the secrets
1:04
now I'm going to start with a white
1:05
undercover if you've got bone use bone
1:07
why why I hear you ask easy because I'm
1:10
going to coat over the model we're going
1:10
to start from light and work to some
1:12
dark areas so the whole model is going
1:14
to get coated in wash and then we'll
1:15
just build up some of those darker tone
1:17
sets just a lot easier to get those
1:19
Deathwing painted we're going to start
1:21
off with an all-over application of
1:22
seraphim sepia again be mindful when
1:24
doing this because it will pull and
1:25
there's gonna be lots of little areas
1:27
where it will collect so just keep an
1:28
eye on when you're doing this and then
1:29
just get a brush right off and soak up
1:31
any excess
1:37
all right
1:39
without shade now thoroughly dry and I
1:41
get some AK pale salmon I'm just going
1:43
to lightly dry brush over it's going to
1:45
kind of Tide up the edges also tied up
1:47
some areas that may have had a bit too
1:48
much wash pool here and there
1:50
[Music]
1:54
now we're gonna pick out all the black
1:57
details and get those Silvers prepped as
1:59
well and for this we're using the mighty
2:00
black Legion
2:03
foreign
2:07
[Music]
2:10
so next up is to use some oily steel and
2:12
pick out all those silver details again
2:13
just check over because I did actually
2:15
forget to pick out those little studs on
2:17
his left leg so just be mindful and
2:19
check the box out if you're not sure
2:21
[Music]
2:26
for any green details they're like the
2:29
little Eagle across the chest and we're
2:30
using orc flash here I'm not really
2:32
going to thin it down because as it
2:33
dries that light undercoat like the
2:36
white with the surface is going to punch
2:37
out and give you some nice natural
2:39
highlights and as it settles in the
2:40
recesses it's gonna look nice and dark
2:42
and you can see just around those wings
2:44
I'm actually not going to like neatly
2:45
paint around it I'm just going to flood
2:46
it with contrast and it just it's just
2:49
going to emphasize those wings and look
2:50
like you put a lot of effort in when you
2:52
haven't
2:52
[Music]
2:54
we're now going to apply some ball red
2:56
to the red details this is mostly going
2:58
to be the company badge uh the gun
2:59
casing so that's going to make it stand
3:01
out different as a different texture
3:02
because it's going over silver and if
3:03
you've got any Purity seals so the wax
3:05
parts of a purity seal just apply that
3:07
to that as well
3:09
[Music]
3:15
next up we're going to paint up the
3:17
stone or gray details using AK dark sea
3:20
gray now I've thinned this down a little
3:21
bit so it's like three parts water to
3:22
one part paint and the reason for doing
3:24
this is the quick sort of easy steps
3:27
it's going to highlight it for you so
3:29
you're going to get some nice gray
3:30
effects in those recesses but as it
3:32
pulls away a bit like a contrast it's
3:34
going to give you a nice highlight
3:34
because there is actually no decent
3:36
contrast at the moment that's like a
3:38
nice mid-tone gray next up I'm going to
3:40
use AK bronze for all the gold details I
3:42
know it's bronze and I'm using it for
3:43
gold don't worry about it I'm just gonna
3:45
pick out any gold details such as like
3:47
belt buckles those skulls on his
3:49
knuckles and also any bullets as well
3:51
then we're going to shade all the
3:52
details except the bone with normal oil
3:54
don't worry if you get any normal on the
3:56
bone we're literally going to tidy that
3:58
up in a moment or two with some pale
4:00
sand
4:01
[Music]
4:07
and like I said just work your way
4:08
around the model tighten up any bits
4:10
you've splodged with like red green
4:11
black or whatever and just use pale sand
4:13
for that it's quite close to this effect
4:15
so it's not going to stand out too much
4:17
[Music]
4:24
so with the Dark Angels they do have
4:26
three different color schemes so picking
4:27
a base in color can be quite tricky here
4:29
what I'm going to do with our Basin is
4:31
go for a nice mid-tone gray we can have
4:33
some green nuances in there as well and
4:35
that's mainly to look like algae or Moss
4:37
or whatever now the thing is
4:39
dark bait dark models need light bases
4:42
light models need Dart bases when you've
4:43
got a mixture you need something that's
4:45
like a mid-tone which is why we're going
4:46
for gray so it looks fine on those nice
4:48
beige white looking Deathwing also works
4:51
really well with a raven Wing which are
4:52
black and also works really well with
4:54
those uh green armored troops but Brown
4:56
could do it sand less so maybe because
4:59
it's going to clash for the death Wing
5:00
so just pick a color it's nice and
5:01
neutral and works across all three color
5:03
schemes start off with AK lunar desert
5:06
now I like to thin down with a bit of
5:07
water just around the feet because then
5:09
it just flows around a bit more and
5:10
there's less danger of me like splodging
5:12
it onto the actual toes so work your way
5:14
around and you want to leave it like an
5:15
hour or so to dry after that I'm going
5:17
to get some AK green skin soils this is
5:19
one of those liquid pigments and I flood
5:21
that across the model in some place you
5:23
can get there thinner and just like thin
5:24
it down here and there but when it dries
5:26
it will give you kind of like a Mossy
5:27
algae kind of effect it's gonna look
5:28
really nice especially when we dry brush
5:30
it and like I said we're now going to
5:32
move on to a dry brush and here we're
5:33
going to use pale sand again as a final
5:35
dry brush once that's done all you need
5:38
to do is just Rim the base and I'm just
5:39
going to use steel Legion drab as I
5:41
always do because it's the best color
5:42
ever for trims it just is black now you
5:46
want this color
5:48
and there we have it our Deathwing
5:50
Terminator is ready for the tabletop but
5:52
keep watching if you want to see some
5:53
extra steps applied to him now to add
5:56
some extra steps to your death ring
5:57
we're going to start first by getting
5:58
some AK deep red and we're going to
6:00
layer up first of all that Red Wing
6:02
[Music]
6:12
then we get some AK deep green and also
6:15
lay up those green details
6:16
[Music]
6:23
then get some AK dark sea gray and just
6:27
layer up those Stone details so that's
6:29
kind of just added like a second tone
6:31
just to add a little bit more punch to
6:32
those greens Reds and grays
6:37
now for an extra highlight what I'm now
6:39
going to do because we've already used
6:40
pale sand here is I'm going to mix that
6:41
into all of these colors so I'm going to
6:43
mix a little bit into the Green Mix it a
6:45
little bit into the gray maybe not so to
6:48
the red because I think it'll make it go
6:49
a bit pink and all I'm going to do is
6:50
just add a little bit more emphasis to
6:52
those edges just a little bit here and
6:53
there
6:54
[Music]
7:07
foreign
7:11
any bone areas so that's just the armor
7:13
I'm going to use white for that take
7:15
time work your way around and when I
7:17
often do highlights and I don't always
7:18
do like nice neat lines I like to do
7:20
little jaggedy ones as well makes it
7:21
look a bit battered
7:23
[Music]
7:29
[Music]
7:41
and for his eyes for a little bit more
7:43
punch I'm just going to drop in some
7:44
white just to make it stand out a little
7:46
bit more and take your time make sure
7:48
you've got a nice pointy brush
7:50
foreign
7:52
[Music]
8:00
so after the Deathwing which is the
8:02
first company we're going to move on to
8:03
the second company which is the Raven
8:04
ring now here you say but peachy you're
8:06
using a suit intercessor not a biker or
8:09
an outrider or a land speed a crew
8:10
member I know I'm not to showcase the
8:12
armor a lot easier on one of these guys
8:14
I mean you can just follow this to paint
8:16
the bikes and the land Speeders if you
8:17
need to but the reason for doing it is
8:19
it allows you to easily paint your Dark
8:20
Angels if you want to do preheresy color
8:22
schemes also Fallen if you want to do
8:23
some fallen chaplains and any other
8:26
black armored Spaceman there's plenty of
8:27
flavors out there so this is just a nice
8:29
way of showing you what that looks like
8:31
across the whole model starting off with
8:32
a black undercoat I'm going to get some
8:34
dark sea gray and dry brush all over
8:36
just picking out those edges it can add
8:37
a bit of roughness to it but that's fine
8:39
because we want a bit of roughness here
8:40
because the space means they've been
8:41
fighting Lots
8:43
[Music]
8:46
so next up I'm going to get some black
8:48
Legion thin this down and I do what I
8:49
call reverse Highline so if you don't
8:51
like too much of the roughness this is a
8:52
really nice way of removing some of that
8:54
and what it does if you don't work to
8:55
the edges it actually adds a bit more
8:57
punch to those recesses and those like
8:59
flat zones and gives you more emphasis
9:01
on those highlights
9:03
it's really quick really easy less
9:05
neatness required
9:09
then we're gonna pick out any silver
9:10
areas with oily steel I'll also use this
9:13
on the under suit to help break up the
9:14
shape of the mini as well as it could
9:15
look very black and very shapeless so
9:18
whereas everyone else I tend to use
9:19
black for the rubber undersuits here I'm
9:21
going to use silver because it just
9:22
again adds emphasis to the model I'm
9:24
gonna get some steel Legion drab I'm
9:26
using this for the leather and just
9:28
apply a couple of thin coats just to
9:29
build it up don't forget to do the belt
9:30
as well and I get some of that power
9:32
sand and pick out that bone chest Eagle
9:34
I'll also pick up the Purity seals
9:36
including the wax and also the eyes in
9:38
preparation for the next step and that
9:40
next step is to add some red to those
9:42
areas so on the pure to seal wax and get
9:43
some bar red apply that to the gun as
9:45
well gives it a different feel and also
9:47
drop it into the eyes as well
9:52
then last of all I'm going to get some
9:53
normal and apply that to the Bone the
9:55
red and the silver details I'm not going
9:56
to do this on the eyes though because I
9:58
want those to look a little bit more
9:59
glowy and with that our model is pretty
10:01
much tabletop ready you just need to
10:02
base it like we did with the death Wing
10:04
so next up is the next step section just
10:06
add a bit more love to your models I'm
10:07
going to start off by using pale sand
10:09
and we're just going to pile up any bone
10:10
areas and any parchment areas you might
10:12
have on the model
10:15
then we're going to get some deep red
10:16
and highlight those red areas and again
10:18
I'm just going to be a bit rough with
10:19
the edge highlighting so it makes it
10:21
look a little bit jaggedy and Scratchy
10:23
[Music]
10:24
then finally get some dark sea gray and
10:27
then chip up and highlight the arm again
10:28
follow that same method you can use the
10:30
edgy brush run across the edges but here
10:32
I like to do like that little stagger
10:33
Jagged effect so it looks a bit battered
10:35
and weathered
10:36
[Music]
10:45
foreign
10:46
[Music]
10:55
[Music]
10:58
so our Raven Wing Marine is now done so
11:01
we're now going to move on to the
11:02
classic green armor of the Dark Angel so
11:04
this basically covers the rest of the
11:06
companies in the actual chapter so I'm
11:08
going to start here with a black
11:09
undercoat you could use gray if you want
11:11
to and then just base coat with it with
11:12
a green but I'm going to use black and
11:14
I'm gonna over brush with like deep
11:16
green or caliban green whichever you've
11:18
got and it's going to leave a lot on the
11:19
recesses so it'll be black in the
11:21
recesses but it's just a really quick
11:22
and cheeky way of getting some basting
11:24
base coats done layered but also
11:26
maintaining some recesses in there as
11:28
well
11:29
so there we are like I said I'm just
11:31
going to get dark green and heavily over
11:33
brushed this is a mix between like a dry
11:35
brush and a layer so I don't rub as much
11:37
off the actual brush itself just to rub
11:39
a little bit off on some tissue paper
11:40
and then I just heavily go over I try
11:42
and follow the Contours as well on the
11:44
actual model so I'm not I'm trying not
11:46
to get too much into the recesses so it
11:48
stays black
11:48
[Music]
11:55
after that I'm going to get some light
11:57
green or warp Stone glow will do and I'm
11:59
just going to lightly dry brush those
12:01
areas if you do if you go too far don't
12:03
worry because it could end up looking a
12:05
little bit like a salamander but that's
12:06
fine because later on I'm going to knock
12:07
that back with some normal oil anyway
12:10
[Music]
12:11
[Applause]
12:16
then it's tidy up the under seat with
12:17
some black Legion and also pick out any
12:20
guns if you've got like green on there
12:21
as well in preparation for adding some
12:23
silver
12:28
and next up is using oily steel for the
12:29
silver details again just pick out those
12:31
good working parts on the guns and also
12:33
don't forget to paint up the actual gun
12:35
casings as well because we need those
12:36
silver and ready for when we apply some
12:38
red later on
12:41
any goal details just apply some AK
12:44
bronze I also forgot to do this on the
12:46
actual little wrist thing on our Raven
12:48
Wing guy so you know if you're doing
12:49
Raven Wing don't forget to do that as
12:51
well if they've got gold details
12:53
then we're going to pick out any bone
12:54
details such as the chest Eagle also any
12:56
parchment details and the eyes using
12:59
pale sand
13:00
[Music]
13:10
then we're going to get some bar red and
13:12
apply that to the gun casings as well as
13:13
the little wax details if you've got any
13:15
like pure to seals and also drop it into
13:17
the eyes as well again gives you a nice
13:19
bit of a glowy effect
13:23
let me get some steel Legion drab I'm
13:25
using this for the leather and just
13:27
apply a couple of thin coats just to
13:28
build it up don't forget to do the belt
13:30
as well
13:32
and then pretty much we're going to coat
13:33
the whole model in known oil again the
13:35
only thing I'd say avoid here is the
13:37
glowy eyes but if you do get in there
13:39
just tidy back up and that model is
13:40
pretty much ready for the table top
13:41
again just needs Basin check out how we
13:44
did the death wing for that
13:49
[Music]
13:51
so we're now going to move on to the
13:52
extra steps and first of all just to add
13:54
a bit more love we're just going to tidy
13:56
up that green armor with a little bit of
13:58
deep green again not too much I've
13:59
thinned it down a bit and I also thin it
14:01
apply a bit on the actual shoulder pad
14:02
and then just like lick my brush and or
14:05
use some water it's up to you just to
14:07
move it around the model a bit just to
14:08
thin it down
14:10
[Music]
14:19
I'm going to highlight or chip the armor
14:21
and we're using AK light green here
14:23
again following the same processor done
14:25
with the other two which is just a bit
14:26
more of a jaggedy effect and just work
14:28
your way around you don't have to do
14:29
every armor panel just like pick out the
14:31
ones where the light's going to catch
14:32
[Music]
14:44
then follow the same process for the red
14:46
areas of this we'll be using deep red
14:48
again
14:49
picking out the bone and the parchment
14:51
will be using pale sand
14:55
[Music]
14:59
now for the leather
15:00
what I'm going to do here is get some
15:02
steel Legion drab tidy back up those
15:03
raised areas again doing a little bit of
15:05
a scratchy kind of effect just to make
15:06
it like leather and then when I've done
15:08
that just to mix a little bit of pale
15:10
sand into the steel Legion drab just for
15:12
a lighter highlight uh I you could get a
15:14
lighter tone if you want to but I'm just
15:16
going to use what I have on the palette
15:17
and then just mix that together 50 50
15:19
and then you can just highlight the
15:20
edges so there we have it
15:23
a nice quick way of painting three
15:25
different color schemes for the same
15:26
Army and making it nice and cohesive as
15:28
well pretty quick pretty straightforward
15:31
and also these colors can easily
15:33
transfer to things like tanks if you
15:35
want to know how to do that check out
15:36
this video here now obviously the color
15:38
scheme is different but it's more the
15:39
actual processes and techniques and
15:41
methods that are in that video that will
15:42
help you transfer these schemes to tanks
15:45
hope you like this video don't forget to
15:47
check out all the links in the
15:48
description like And subscribe and until
15:50
our next booting
15:59
stand still thank you