Up next in 10


Grab Atlas VPN for just $1.70/mo + 6 months extra before the BLACK FRIDAY deal expires: https://get.atlasvpn.com/PaintingPhase 😎
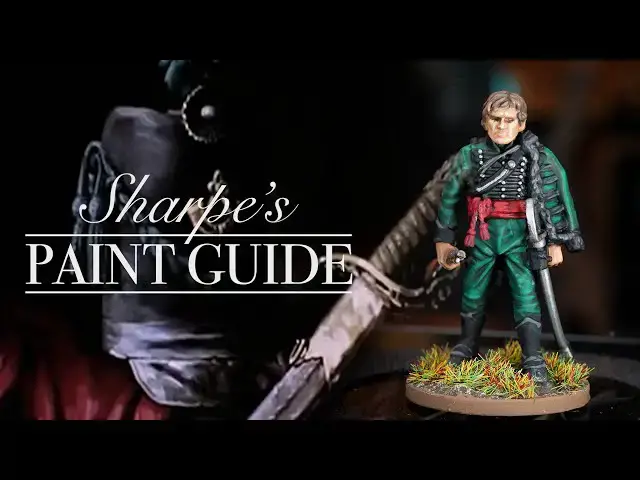
Peachy loves Sean Bean, so much so he decided to paint him and create his own battle report/episode of Sharpe. In this painting tutorial you can learn to paint Sharpe (Sean Bean), a British red coat, the French, and some bonus tartan.
Check out the battle report on Games Night: https://youtu.be/ogFsMEm2ej8
Join our Patreon: https://patreon.com/thepaintingphase
Merch: https://thepaintingphase.creator-spring.com
Streaming: https://www.twitch.tv/thepaintingphase01
Help Support the channel with our affiliate links:
UK & EU: https://affiliates.waylandgames.co.uk/idevaffiliate.php?id=1214
UK: https://elementgames.co.uk/?d=10835
EUROPE: https://taschengelddieb.de/?affiliate=tpp
US: use code paintingphase to get 10% off at https://www.goblinshut.com/
We Print Miniatures: https://weprintminiatures.com/thepaintingphase
THEPAINTINGPHASE for 10% off
Follow us:
Show More Show Less View Video Transcript
0:00
this video is brought to you by Atlas
0:02
VPN sha Bean the people's Champion a man
0:06
who's most famously for his onscreen
0:08
death such as the time when 007 dropped
0:10
a radar dish on his head all that time
0:12
when he tried to play politics in
0:14
Westeros and didn't make much Headway
0:16
but of course we all remember the time
0:17
when he was turned into a giant Warrior
0:19
pincushion courtesy of the urai of Eisen
0:22
guard but there is one character that
0:24
has survived the test of time and been
0:26
played by Sha bean and that is rard
0:28
sharp a dashing Rifleman who fought his
0:30
way across the Iberian Peninsula during
0:32
the Napoleonic Wars but why a video
0:34
about sha bean and Richard Sharp I'm
0:37
glad you
0:44
went reason number one well it's Richard
0:47
Sharp it's sha bean and it's Napoleonic
0:50
and they're the things they get out of
0:51
bed for honestly they truly are but the
0:53
other reason recently we did a little
0:55
collaboration with games Knight now if
0:57
you don't know who games Knight are they
0:59
are a fun bat report channel uh check
1:02
the link in the description they do all
1:03
sorts of stuff lots of different theme
1:05
games but they are heavily story driven
1:07
really narrative lots of Cliffhangers
1:09
and I strongly recommend giving and
1:11
watch but they kindly asked us to join
1:12
them and we created an episode of sharp
1:16
which was absolutely amazing to do and
1:18
this is a homage to that and also
1:20
teaching people how to paint the stuff
1:21
that was featured in that show as well
1:23
we think we know at this stage what a
1:25
VPN is right with the simple click of a
1:27
button you can whisk yourself off to
1:29
another country
1:33
online oh that didn't seem to work I'll
1:35
try
1:37
[Music]
1:39
again bour La France just we Atlas
1:44
VPN so with Atlas VPN not only can you
1:47
unlock your favorite content from
1:49
different countries online if it's a
1:52
quiet day in the office I'm partial to
1:53
putting my feet up and watching Mean
1:55
Girls on Canadian
1:58
Netflix you go GL Coco Atlas VPN also
2:01
keeps your searches private stops ads
2:03
and malware by stopping malicious links
2:05
ads and trackers it'll even notify you
2:08
if someone's trying to steal your data
2:10
it saves you some money online while
2:12
shopping that includes subscriptions
2:14
like Netflix and Spotify but also
2:16
Airlines hotels and more Atlas VPN also
2:19
protects you on an unlimited amount of
2:21
devices so if you got a desktop a laptop
2:24
your mobile it's all covered under one
2:26
subscription and you can now enjoy the
2:29
black Friday price cut because now Atlas
2:32
vpm premium is just $11.70 per month
2:36
plus 6 months free extra with a 30-day
2:40
money back guarantee protect your
2:41
privacy and get many benefits of Atlas
2:44
VPN for a ridiculously low price you can
2:47
take this deal by clicking on the link
2:49
in the video description you've got to
2:51
be fast cuz this is a limited time offer
2:53
now after my Adventures it's back to
2:56
peachy painting Napoleonic stuff and
2:59
Sean Bean stab but without further Ado
3:02
let's crack on and paint sharp so
3:04
starting off with red sharp we're going
3:05
to begin with an undercoat of mechanic
3:07
standard gray so doing this all over and
3:09
I'm going to get some black green and
3:10
going to paint this mostly over the
3:12
model try and keep it to the the cloth
3:14
like the tunic and the trousers if you
3:15
get other things don't worry because you
3:17
can paint over those in a bit next up is
3:19
to pick out all the black details such
3:20
as belt straps fur and lace and for this
3:22
I'm just using black then it's dirty red
3:25
for the sash you might want to do a
3:26
couple of coats just to get a nice
3:27
strong red coming through then going to
3:29
pick out skin using cork then for his
3:31
hair I'm going to start off with dark
3:32
brown I know in the show he has like
3:34
blonde hair I'm going to start with a
3:35
dark brown first and also pick out the
3:36
musket and other Brown related details
3:39
then for any silver details I'm going to
3:40
use oily steel for the brass I'm going
3:42
to be using brass and once all those
3:45
bits are applied any time you might need
3:47
to do if you got like some black on the
3:48
green or whatever do that now and then
3:49
we're going to coat over with black
3:50
knight deep shade do that all over and
3:53
leave them to dry so our model is now at
3:55
a point where it's tabletop ready so you
3:56
can base it and start playing games of
3:58
it but if you want to add some extra
3:59
love we're going to do that that now
4:00
where we're going to add some highlights
4:01
to Richard Sharp I mean as a character
4:02
it's Richard Sharp he needs love we love
4:05
him so we're going to highlight him so
4:06
our first stage is to tide up those base
4:08
coats if needed so all I'm going to do
4:10
here is get that green just TI that back
4:12
up add a bit more punch to it same like
4:13
the flesh as well as the Browns and the
4:15
silvers you don't have to go too mad
4:17
it's just to add a little bit of extra
4:18
punch to those colors our first
4:20
highlight is going to be dark green and
4:21
this is for the uniform acting as a
4:22
highlight and in some places you can do
4:24
it as a layer so like on his police and
4:25
his jacket um you can just pick out
4:28
those colors a bit more broader if you
4:29
need too then we're going to highlight
4:30
the fur and for this we're using Ash
4:32
Gray and then I'll also do that on some
4:34
other details like maybe some of the
4:35
lace here and there as well as his boots
4:38
and it's highlighting the skin using
4:39
radiant flesh just picking out like the
4:41
nose the brow the cheeks the lips stuff
4:44
like that his ears don't forget his ears
4:46
wise he can't hear commands cuz we have
4:48
two ears and only one mouth so we should
4:50
listen twice as much as we speak thanks
4:52
ter raasa now going to highlight the
4:54
hair for this I'm using light Earth and
4:56
in places you might want to mix some
4:57
dark brown into there as well just for a
4:59
bit of transition position so it's not
5:00
too Stark then I'm going to get a little
5:01
bit of light green and mix that into
5:03
dark green just for some highlights on
5:05
his chunck and trousers you if you got
5:06
like a lighter green you can use that I
5:08
just had those at hand and just mixed
5:09
them on the wet palette so our Richard
5:10
Sharp is now highlighted up so all we
5:12
need to do now is base before we base
5:15
you'll notice I have used pennies on
5:17
this model I use that for all my n on
5:19
it's mostly skimmish and a lot of people
5:20
do that as well it's quite a
5:22
cost-effective way of actually B your
5:23
models two reasons one it's quite sturdy
5:26
because it's metal and keeps those
5:28
plastic models keep falling over and
5:31
second it's really cheap because you can
5:32
get 100 pennies for a pound I know
5:35
Math's right that's 100 bases you tell
5:37
me elsewhere where you can get 100 bases
5:39
for a pound nowhere it's mad so that's
5:42
what we use pennies but don't def face
5:43
the Queen's face or the king chever you
5:46
always have that at the bottom can't def
5:47
face that that's a crime sharp would not
5:50
be happy first we're using muddy ground
5:52
in places I'm going to use a bit of
5:54
water just I can move around the feet so
5:55
it's just a bit easier to get in in
5:57
those knoks and crannies and then just
5:58
build up the layers of Muddy ground
5:59
ground and once that's thoroughly dried
6:01
you need to get some light Earth and
6:02
just dry brush that over this is just
6:04
going to help pick out some that texture
6:06
if you want to you can dry brush some of
6:07
this around the trousers for a bit of
6:08
dirt and dust as well then it's classic
6:10
steel Legion drab for the rim and I get
6:12
some old school static grass a little
6:14
bit of super glue first doop that on
6:16
here and there and I'm just going to
6:17
drop it in my tub of static grass get
6:19
some tweezers move it around and then
6:20
once you get it out just give it a
6:21
little tap on its bom any excess will
6:23
just fall off with Sean being done we're
6:25
now going to move on to a classic
6:27
British red coat from the Napoleonic
6:28
Wars this guy is one of the ones
6:30
featured in the game it's the seventh
6:32
fusel ears but you can just change the
6:34
colors and cuffs to whatever color
6:35
scheme you want to do but this is a nice
6:38
quick way of getting those Red Coats
6:39
onto the tabletop after a gray undercoat
6:42
the first step is to get some white gray
6:43
and I'm going to dry BR this all over
6:45
the model I'm going to be quite heavy
6:46
around things like straps or stuff that
6:47
I want light or white and just a bit
6:49
lighter around things like the trousers
6:51
but you know what if it does go a bit
6:52
heavy don't worry because you'll be
6:54
adding paint later anyway then we're
6:56
going to apply some barall red to the
6:57
jacket and the plume now do expect some
6:59
some of this to go on the white like the
7:00
straps that's fine cuz we'll TI those
7:02
straps up later it's more just to get
7:03
into those recesses but as it dries some
7:05
of those previous white Gray highlights
7:07
will pop through a little bit they won't
7:09
look too pink but they will give you a
7:10
nice little subtle highlight then it's
7:12
moving on to all the black details this
7:13
is shoes the havac the shacko hair if
7:16
you want it to be as well just work your
7:18
way around picking out those black
7:19
details then we move on to the brown for
7:21
this we're using dark brown and we're
7:22
picking out the musket the hair if you
7:24
want to as well as the canteen strap and
7:26
the canteen itself then for the side
7:28
bags I mean you can paint those white
7:29
but I'm going to do beige cuz it helps
7:30
break up the shape a little bit so just
7:32
a couple of coats of beige on there and
7:34
sky blue for the canteen really like
7:35
that color scheme having sky blue
7:37
canteens just a couple of coats on the
7:38
actual canteen itself then we'll move on
7:40
to the skin and for this again I'm using
7:42
cork cuz it's an amazing color and I use
7:44
it all the time again you might want to
7:45
do a couple of coats then for any silver
7:47
details we're using oily steel and again
7:48
for the brass we're using brass and at
7:51
this point you can decide what you want
7:52
to do with the cols and cuffs again I
7:54
said I'm going to be doing mine as the
7:55
seventh fusers so I'm using storm fiend
7:57
here I've not tied up the white at this
7:59
point because I know there's some white
8:01
details on the collar and the Cuffs so
8:03
get the blue on first or the green or
8:05
yellow whichever regiment you're going
8:06
to do get that on let it dry and then
8:07
we'll move on to the Tidy knob again
8:09
just work your way around picking out
8:11
those straps The Rook Sack or hav sack
8:13
straps like little bits of lace on his
8:16
chest on his collar on his cuff anything
8:18
that just needs a little bit more punch
8:20
this is the time to do it then last up
8:22
is to apply a shade all over and this is
8:24
going to be Black Knight again and I'm
8:25
applying that all over and let that run
8:27
into recesses this is a real quick way
8:28
of getting the model onto the tabletop
8:30
so at this point you can leave your
8:31
model like that once You' got like 30 or
8:34
40 of these figures in a in a battalion
8:36
it will look great so you don't even
8:38
need to highlight them but as a top tip
8:40
what we're going to do now is what I
8:41
call the regiment level um which is when
8:43
you got like 30 40 figures just going to
8:45
highlight the face so we're going to
8:46
move on to that now for regiment level
8:48
and for that we're just going to tidy up
8:50
the face with cork again so kind of a
8:52
highlight and then we're also going to
8:53
do a highlight of radiant flesh as well
8:56
so all we're doing here is picking out
8:58
the skin nothing else so there we are
9:00
we've got it up to this point where you
9:02
could just do a regiment when you've got
9:03
the model based and you got like Flags
9:05
in the unit that will look exceptional
9:06
you don't have to worry about like
9:07
picking out the rest of the colors like
9:09
highlighting the Reds doing the white
9:10
you can just leave them at that and
9:12
they'll look great as a regiment and
9:13
some of the things in the show I did
9:14
that with as well um but if you're
9:16
playing skirmish games or you want to
9:18
put a bit more love stay tuned for the
9:20
next steps cuz that's where we're going
9:21
to do some highlights see as we've
9:22
already done the skin we don't need to
9:24
touch that now so we're going to move on
9:25
to the red jacket and first of all I've
9:27
used bar red so I'm just going to tied
9:28
it with some blood red which is nice and
9:30
Punchy and in places that's going to act
9:32
as a highlight as well as a layer then
9:34
get some burn orange for final highlight
9:35
just on some of those folds of the cloth
9:37
Ash Gray to highlight any black details
9:39
again shako Boots the havac if needs be
9:42
you can tie up the straps with some
9:43
white gray again and also on the lace
9:45
and the collars and cuffs and an extra
9:47
top tip which I I've learned from a few
9:50
good friends is using a chrome pen for
9:52
swords and bayet this might feel like
9:54
you're undoing some of the painting the
9:56
bayonet silver but actually it's just
9:57
adding a little bit of extra shine to
9:59
that and it looks great when you got the
10:00
regiment all together in like line or
10:02
column formation because the light the
10:03
actual light around is just picking up
10:06
that Chrome effect and just Glitters
10:09
like it would in the sun it's just a
10:11
real quick easy way of making your
10:13
bayonets look like you put more time
10:14
into them than you actually have so top
10:16
tip do that for swords I'll do that on
10:17
Cav as well now if you have any Scots in
10:20
your army stay tuned because we're going
10:22
to do a little bit at tart no we didn't
10:24
do any Scots in the actual ble Report
10:26
with games night I feel this is a
10:28
perfect place to show how to paint
10:29
Tartan certainly at 28 mil scale so
10:32
we're going to do that now and show you
10:33
how to paint the black watch Tartan
10:35
we're going to start first you could use
10:36
light prush and blue but here I'm using
10:38
storm fiend cuz I've already used that
10:39
already in this paint guide for my
10:41
collors and cuffs so apply that all over
10:43
you might want to do a second coat then
10:44
I get some dark green and I do some
10:46
vertical stripes first of all just work
10:48
my way around there's a bit of a pleated
10:49
section around the back which can be a
10:50
bit tricky just take your time with that
10:52
and you need to do some horizontal
10:54
sections as well I tend to keep the
10:56
actual Tartan a bit larger than life so
10:58
I have like like two horizontals and
11:00
about three verticals at the front nice
11:03
and Broad now you can mix in another
11:05
green as a highlight here and there on
11:06
the actual green sections themselves but
11:08
because we got some of that lighter
11:09
green we used early where we mixed in
11:10
some light Earth I'm just going to use a
11:12
bit of that just to add a bit more punch
11:13
to some of the center sections of the
11:15
green stripes because this is government
11:17
Tartan that was issued to all the black
11:18
watch and I'm going to be adding some
11:20
red pin lines to that section so that's
11:22
kind of in within the green this might
11:24
take a bit of time getting used to but
11:26
this is why it's all done in the base
11:27
coat stage because if you're making a
11:28
mistake you can just go back over that
11:30
previous green and redo it and there we
11:32
are that's quite a straightforward most
11:34
of this was all base coats there's no
11:35
highlighting it was just all base coat
11:37
applied broad lines to start off with
11:40
and then just a really fine red line but
11:41
you don't have to add the red fine line
11:43
if you don't want to you just leave it
11:44
blue and green it will look fine it look
11:45
like Tartan and that's the key is it
11:47
looking like Tartan from a distance
11:49
artistic license not
11:52
realistic example of how it should look
11:55
our red coats are done we're now going
11:57
to move on to the French and there's two
11:58
ways of doing the French the first we're
12:00
going to show you is one of the
12:01
regiments I used in the game which was
12:03
they all had white including the white
12:05
chix certain period in the war they ran
12:08
out of indigo die so it's a really quick
12:10
way of painting French if you don't want
12:11
to like fap around and do all the Blue
12:13
Jackets so we're going to do that first
12:14
and then just if you want to do the
12:15
traditional looking French infantry with
12:17
the Blue Jackets We'll add that on at
12:19
the end how to do that so from a white
12:21
undercoat we're going to get some so
12:23
black gray and apply this all over that
12:25
is just going to run into those cracks
12:26
and add some nice definition to all the
12:28
detail details and pretty much shade
12:30
most of the white with the S black gray
12:32
dry we're now going to pick out all the
12:33
black details that's things like the
12:35
shoes the havac the shako even the hair
12:37
if you want it to be so just work your
12:38
way around picking those details out
12:40
then we going to use some brown again
12:41
this is for things like the musket the
12:43
hair if you want to mustaches they like
12:45
their mustaches and beards and canteen
12:47
straps as well the actual backpack
12:49
itself cuz it's fur just thin down that
12:51
brown a little bit and it'll just look a
12:52
little bit lighter and like a different
12:53
tone of brown even though it's the same
12:55
color you just send it down then we're
12:56
picking up the skin using cork again a
12:58
couple of coats if you need to so for
12:59
any silver details we're going to be
13:00
using oily steel so work your way across
13:02
the musket and anything else on the
13:04
model that might look silver then again
13:05
brass for the brass bits again this is
13:07
going to be on the musket but also they
13:09
have like a little shako plate as well
13:10
so pick that out like the British red
13:12
coat depending on the regiment you're
13:13
doing you might want to do a different
13:15
color for the collors and cuffs with
13:16
this particular regimen I'm going to go
13:18
red although it's not quite the same as
13:19
one in the actual batter report that we
13:21
did it will make sense later on when we
13:22
have blue so this is just red for a
13:24
standard fuselier that you'll probably
13:26
recognize from the French army and I'm
13:28
just going to get some granite and use
13:29
that for the bed roll at the back also
13:31
depending on what company you're going
13:32
to do your French has they have
13:34
different color pom poms red is for the
13:36
grenadiers and then they have a
13:37
multitude of colors and if you do
13:38
voltages which are like the light
13:39
infantry they have green and yellow cuz
13:41
they have like a little bit of extra bit
13:43
at the top but this one is the second
13:45
company which is sky blue so use sky
13:47
blue at this point just tied up any
13:49
white sections using white gray again if
13:51
you got any like lace or like your belts
13:53
have got like bits of black on it or
13:55
brown just TIY back up and then we're
13:56
going to get some Black Knight deep
13:57
shade again and apply that all over
14:00
surprise like our previous models you
14:03
can just play games with them you can
14:04
always do the regiment level as well if
14:05
you want to to like a DI with the
14:06
British red Kit where you can just
14:07
highlight the face and leave it at that
14:09
but we're going to move on to the next
14:10
steps now just sh how to highlight it
14:11
and also turn your French fuselier into
14:14
a more traditional French fuselier for
14:16
our next steps we're going to start by
14:18
titing up the white cuz we've add some
14:19
shade on there just going to make it the
14:21
majority of the model again we're doing
14:23
this on the tunic as well because this
14:24
is for the version that has white tunics
14:28
then tie up any remaining base coats if
14:30
need be so this is going to be like
14:31
things like the black any brown any
14:33
Silvers the skin as well so just work
14:35
your way around tied them those previous
14:37
base coats if they need it then we're
14:38
going to highlight the black using Ash
14:40
Gray highlight the skin using radiant
14:42
flesh can work your way around and if
14:44
you do have mustaches apply the color
14:47
for the mustache now and then we're
14:48
going to get a chrome pen and just pick
14:49
out that bayonet and at this point our
14:51
French line infant is now done in the
14:54
white uniform but to turn it into the
14:56
traditional blue we're just going to get
14:58
some storm fiend and apply a coat to the
15:00
tunic and when that's dry we're going to
15:02
apply a second coat both of these are
15:04
quite thin down 50/50 water and storm
15:07
fiend first coat same mix again for the
15:09
second coat it's just to add a bit more
15:11
definition and you'll get some
15:12
highlights popping out as well and if
15:13
you need to at this point you can just
15:15
tied up any white as well that you might
15:16
have done but this is the traditional
15:18
way of doing your French Fus aers so
15:21
there we are our very own paint guide to
15:23
paint Richard Sharp AKA sha bean and
15:25
guess what he survived yet again I'm so
15:29
good job Rich deliver it no
15:33
Pat oh no so whether you're a fan of
15:37
sharp you have an abundance of British
15:38
or French to work through or you're
15:40
delving into the horrors of the silver
15:42
bayonet I hope you find this video
15:44
useful and of course don't forget to
15:46
check out the battle report we did with
15:48
games night which was Sharp's return it
15:50
was good fun it felt like we're playing
15:52
an actual episode of sharp as well so go
15:55
check them out you will not be
15:57
disappointed and of course don't don't
15:58
forget to like And subscribe that
16:00
obviously helps the channel and of
16:01
course massive thank you to our patrons
16:02
for even allowing us to do mad things
16:05
like that you guys are magnificent thank
16:06
you very much you bunch of
16:10
beautiful in the words of sha being and
16:12
just before you go remember you can now
16:14
enjoy the Black Friday price cut because
16:16
Atlas VPN is just $1.70 per month and
16:21
you get 6 months extra with a 30-day
16:24
money back guarantee protect your
16:26
privacy and get many benefits of Atlas
16:28
VPS for this ridiculously low price you
16:31
can take this deal by clicking the link
16:32
in the video description below be quick
16:35
it's a limited time offer
#Online Video
#Painting
#Hobbies & Leisure